How to Pressure Wash a House: The Right Way to Clean Every Type of Siding
Quick Comparison
| Product | Best For | Buy |
|---|---|---|
 Greenworks Pro GPW3000 (Best Overall) Greenworks · Electric (corded, 120V) · 47 lbs | Homeowners who want the strongest electric cleaning power without dealing with gas | |
 Sun Joe SPX3000 (Best Value) Sun Joe · Electric (corded, 120V) · 31 lbs | Budget-conscious homeowners who need reliable cleaning for cars, decks, and patio furniture |
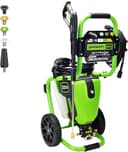
Greenworks Pro GPW3000 (Best Overall)
Homeowners who want the strongest electric cleaning power without dealing with gas
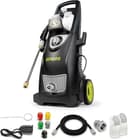
Sun Joe SPX3000 (Best Value)
Budget-conscious homeowners who need reliable cleaning for cars, decks, and patio furniture
Knowing how to pressure wash a house is one of the most valuable outdoor maintenance skills you can have. I think it's the single best return on a Saturday afternoon: a few hours with a pressure washer can strip away years of dirt, mildew, algae, and grime, making your siding look almost new. It boosts curb appeal, prevents mold from eating into your home exterior, and can even extend the life of your paint job by several years.
Here's the truth most people don't realize: pressure washing your house incorrectly can cause more damage than skipping it entirely. From common power washing mistakes I've seen, too much pressure cracks vinyl siding. The wrong spray angle forces water behind your clapboards and into your wall cavities. Spraying windows at close range shatters seals and breaks glass. Every year, homeowners cause thousands of dollars in damage because they grabbed a pressure washer without understanding the basics.
This guide walks you through the entire process of how to pressure wash a house, from choosing the right PSI for your siding type to the exact spray technique that cleans without causing damage. Follow these steps and you'll get professional-looking results without the $300 to $600 price tag of hiring a service.
Equipment You'll Need
Before you start, make sure you have everything on hand. Running back to the hardware store mid-project with a half-soaped house is not ideal.
Pressure Washer:
A gas or electric pressure washer with at least 2,000 PSI and 2.0 GPM (gallons per minute) gives you the flexibility to handle most residential siding. You'll dial down the pressure for the actual washing, but having headroom in the machine means it won't struggle. I'd suggest starting with an electric model if you've never power washed before, since they're lighter and easier to control. If you don't own one, check out our best pressure washers roundup for top picks at every budget.
Nozzle Tips:
Pressure washers use color-coded nozzle tips that control the spray angle and intensity:
- Red (0 degrees): Never use on siding. This concentrated jet will cut through wood, crack vinyl, and damage mortar.
- Yellow (15 degrees): Too aggressive for most siding. Use only on heavily stained concrete.
- Green (25 degrees): Good for rinsing hard surfaces like brick.
- White (40 degrees): The go-to for house siding. Wide fan pattern, gentle enough for most exteriors.
- Black (65 degrees/soap): Designed for applying detergent. Low pressure, wide spray.
For house washing, you'll primarily use the black (soap) tip for applying detergent and the white (40-degree) tip for rinsing.
Detergent:
Use a pressure washer-specific house wash detergent. These are formulated to break down mildew, algae, and oxidation without harming plants or painted surfaces. Look for products labeled as biodegradable and safe for use on siding. Never use bleach at full strength in a pressure washer. It corrodes the pump seals and kills landscaping.
Safety Gear:
- Safety glasses or goggles (flying debris is a real hazard)
- Closed-toe shoes with good grip (surfaces get slippery fast)
- Long pants and a long-sleeved shirt
- Hearing protection (gas models are loud)
- Gloves (optional, but helpful when handling detergent)
Other Supplies:
- Garden hose with adequate length to reach the pressure washer
- Extension wand or telescoping wand (to reach second-story siding without a ladder)
- Plastic sheeting or tarps (to cover plants and delicate fixtures)
- Painter's tape (to seal around outdoor outlets and light fixtures)
Choosing the Right PSI to Pressure Wash a House
This is where most DIYers go wrong when they try to pressure wash a house for the first time. They crank the machine to maximum and blast away, not realizing that different siding materials have very different pressure tolerances. In my opinion, using too much PSI is the fastest way to turn a cleaning project into a repair project.
Here's a breakdown of safe PSI ranges by siding type:
Siding Type: Vinyl | Safe PSI Range: 1,300 to 1,600 | Nozzle Tip: White (40-degree) | Notes: Never exceed 1,600 PSI. Higher pressure cracks and punctures panels.
Siding Type: Wood (painted) | Safe PSI Range: 1,200 to 1,500 | Nozzle Tip: White (40-degree) | Notes: Too much pressure strips paint and splinters wood grain.
Siding Type: Wood (stained/natural) | Safe PSI Range: 1,000 to 1,200 | Nozzle Tip: White (40-degree) | Notes: Even gentler. Test on an inconspicuous area first.
Siding Type: Aluminum | Safe PSI Range: 1,200 to 1,500 | Nozzle Tip: White (40-degree) | Notes: Excessive pressure dents thin aluminum panels.
Siding Type: Brick | Safe PSI Range: 1,500 to 2,000 | Nozzle Tip: White or Green (25-degree) | Notes: Older brick with soft mortar may need lower pressure.
Siding Type: Stucco | Safe PSI Range: 1,200 to 1,500 | Nozzle Tip: White (40-degree) | Notes: Stucco chips easily. Keep distance at 24 inches or more.
Siding Type: Fiber Cement (Hardie) | Safe PSI Range: 1,200 to 1,500 | Nozzle Tip: White (40-degree) | Notes: Check manufacturer guidelines. Some warranties require soft washing only.
The golden rule: Start at the lowest PSI in the range and increase only if needed. You can always add more pressure. You cannot un-crack a piece of siding.
Prep Work Before You Start
Proper preparation takes about 30 minutes and prevents most of the problems homeowners encounter during pressure washing.
1. Walk the perimeter. Look for loose siding, cracked caulking, damaged mortar, and any areas where water could penetrate into the wall. Repair these before washing. Pressure washing forces water into every gap, and existing damage only gets worse.
2. Close all windows and doors. Check every window on every floor, including basement windows. Lock them if possible. Water at 1,500 PSI will push through gaps in window frames and soak your interior walls, curtains, and floors.
3. Cover electrical fixtures. Use painter's tape and plastic sheeting to cover outdoor outlets, light fixtures, doorbells, and any exposed wiring. Water and electricity are a dangerous combination.
4. Protect your plants. Drape tarps or plastic sheeting over shrubs, flower beds, and any landscaping within 6 feet of the house. Even biodegradable detergents can stress plants if applied in concentrated amounts. Soak the soil and plants with plain water before you start. This dilutes any detergent runoff.
5. Clear the work area. Move patio furniture, grills, potted plants, bikes, and anything else away from the house. You need unobstructed access to the siding, and you don't want to trip over obstacles while handling a pressurized wand.
6. Remove or cover downspout extensions and gutter splash blocks. These get in the way and can break if hit with a direct spray.
7. Pre-soak the siding. Use a garden hose to wet the entire wall you're about to wash. This helps the detergent spread evenly and prevents it from drying too quickly on hot days. If the temperature is above 85 degrees Fahrenheit, work in the shade or wait for a cooler day. Detergent that dries on siding before you rinse it can leave streaks and residue that are harder to remove than the original grime.
Step-by-Step: How to Pressure Wash Your House
Follow these steps in order. The technique matters as much as the equipment.
Step 1: Connect and Test Your Pressure Washer
Hook up your garden hose to the pressure washer's water inlet. Connect the high-pressure hose to the spray wand. Turn on the water supply at the spigot and let water flow through the system for 30 seconds to purge any trapped air.
Start the pressure washer and test the spray on a patch of concrete or driveway. This lets you verify the pressure setting and get comfortable with the trigger before pointing it at your house.
Step 2: Attach the Soap Nozzle and Fill the Detergent Tank
Switch to the black (65-degree) soap nozzle. Fill the pressure washer's onboard detergent tank with your house wash solution, following the manufacturer's dilution ratio. If your machine uses a siphon tube instead of a tank, drop the tube into a bucket of diluted detergent.
Step 3: Apply Detergent from the Bottom Up
This is counterintuitive, but critical: always apply detergent starting at the bottom of the wall and working your way up. What I find most important is this one detail, because if you start at the top, the detergent runs down over dry, dirty siding, creating streaks and uneven exterior cleaning marks that are difficult to fix.
Work in sections of about 10 to 15 feet wide. Apply a generous, even coat of detergent to the entire section, overlapping each pass slightly. Stand 6 to 8 feet from the wall when applying soap.
Step 4: Let the Detergent Dwell (But Don't Let It Dry)
Allow the detergent to sit on the siding for 5 to 10 minutes. This dwell time lets the cleaning agents break down mildew, algae, and grime. the detergent is doing the heavy lifting, not the water pressure.
Keep an eye on the siding during this time. If you see the detergent starting to dry (white residue appearing), mist the wall lightly with the garden hose to keep it wet. Dried detergent leaves marks and requires re-washing.
Step 5: Switch to the Rinse Nozzle
Remove the black soap nozzle and attach the white (40-degree) nozzle for rinsing. Adjust your pressure washer to the appropriate PSI for your siding type (refer to the chart above).
Step 6: Rinse from the Top Down
Now you reverse direction. Rinse starting at the top of the wall and work your way down. This pushes the dirty, soapy water downward and off the siding, rather than pushing it up into clean areas.
Hold the wand at a slight downward angle (about 45 degrees) and maintain a consistent distance of 12 to 24 inches from the siding. Use smooth, overlapping horizontal sweeps. Never hold the spray in one spot. Keeping the wand moving prevents damage and ensures even cleaning.
Step 7: Work Around Windows and Trim Carefully
Reduce the pressure when you're near windows, trim, and door frames. Keep the spray at least 12 inches from glass and never direct the spray upward at the bottom edge of a window. Water forced upward under a window frame will find its way inside your house.
For areas around light fixtures and outlets (even covered ones), reduce pressure further or switch to the white nozzle at an increased distance.
Step 8: Move to the Next Section and Repeat
Continue around the house, completing one wall at a time. Apply detergent from the bottom up, let it dwell, then rinse from the top down. Overlap your sections slightly to avoid visible lines between cleaned and uncleaned areas.
Step 9: Final Rinse and Inspection
After you've worked your way around the entire house, do a final walk-around and inspect for any spots you missed or areas with remaining stains. Hit stubborn spots with a second application of detergent and another rinse pass.
Rinse all the landscaping and ground areas around the house with clean water from your garden hose. This dilutes any detergent that reached your plants and soil.
Step 10: Clean and Store Your Equipment
Flush the detergent system by running clean water through it for two minutes. Disconnect hoses, drain residual water (important for freeze prevention), and store the pressure washer in a dry location. Leaving detergent residue in the pump shortens its lifespan.
Siding-Specific Tips
Different materials need different approaches beyond just adjusting the PSI.
Vinyl Siding: Vinyl is forgiving but not indestructible. Always spray at a downward angle, never upward. Vinyl panels overlap, and spraying upward forces water behind the panels and into the house wrap or sheathing beneath. Use the white (40-degree) nozzle and stay at 1,300 to 1,600 PSI. For oxidized vinyl (chalky white residue when you rub it), a dedicated vinyl siding cleaner works better than general house wash.
Wood Siding: Wood requires the gentlest touch. Too much pressure raises the grain, splinters the surface, and strips paint or stain. Keep the PSI at 1,200 or below for natural wood and maintain at least 18 to 24 inches of distance. Use a sweeping motion and never concentrate the spray on one area. After pressure washing wood siding, let it dry completely (48 to 72 hours) before applying any stain or sealant.
Brick: Brick handles higher pressure well, but the mortar between bricks is the weak point. Older homes with lime-based mortar (pre-1930s) are especially vulnerable. Test a small, hidden area first. If mortar crumbles, reduce the pressure or switch to soft washing (detergent with garden hose rinsing). For brick with efflorescence (white mineral deposits), a specialized masonry cleaner is more effective than pressure alone.
Stucco: Stucco is surprisingly fragile under pressure. Chips, cracks, and gouges are common when homeowners get too close or use too much PSI. Keep the nozzle at least 24 inches from the surface and limit pressure to 1,500 PSI maximum. Work in gentle, sweeping passes. If your stucco has existing cracks, repair them before washing. Water that penetrates behind stucco causes structural damage over time.
Common Mistakes That Damage Your Home
Using a ladder with a pressure washer. The recoil from a pressure washer wand is significant, especially at higher PSI settings. That kickback on a ladder can throw you off balance. Use a telescoping extension wand to reach second-story siding from the ground instead.
Spraying upward under lap siding. This forces pressurized water behind the siding, soaking insulation, sheathing, and wall framing. Always angle the spray downward or horizontally.
Pressure washing old, lead-based paint. Homes built before 1978 may have lead paint on exterior surfaces. Pressure washing blasts lead paint chips into your soil and creates a health hazard. If your home might have lead paint, get it tested before pressure washing. Lead paint removal requires specific EPA-regulated procedures.
Skipping the detergent. Homeowners who skip detergent compensate by using higher pressure to clean siding, which damages it. I think this is the most common mistake I see. Detergent does 80% of the cleaning. The water pressure just rinses it away. Let the chemicals work so you don't have to rely on brute force.
Washing on a hot, sunny day. Detergent dries too quickly in direct sun, leaving streaks and residue. Wash on an overcast day or work on the shaded side of the house. Early morning or late afternoon works well in the summer.
Ignoring the GPM (gallons per minute). Everyone fixates on PSI, but GPM matters just as much. A pressure washer with 2,500 PSI but only 1.5 GPM will struggle to rinse large wall sections efficiently. For house washing, look for at least 2.0 GPM. Higher GPM means faster rinsing and less time spent on each wall section.
How Often Should You Pressure Wash?
Most homes benefit from a thorough pressure washing once a year. In my opinion, the best time to power wash your home exterior is spring or early fall, when temperatures are moderate and you're not fighting direct sun.
Some situations call for more frequent washing:
- Homes near trees or wooded areas: Algae, mildew, and pollen accumulate faster. Twice a year may be needed.
- Humid climates (Southeast, Pacific Northwest): Mold and mildew grow aggressively. Plan for two washes per year.
- Homes near busy roads: Road dust and exhaust residue build up quickly.
- Before painting or staining: Always pressure wash before applying new paint or stain. Clean surfaces allow better adhesion.
If you're maintaining your yard with regular cleanups (a good leaf blower helps), you'll notice less debris accumulating on your siding. Keeping hedges trimmed and away from the house also reduces moisture retention and the mold growth that comes with it.
Recommended Tools
Ready to buy? These are the top picks from our best pressure washer guide.
Greenworks Pro GPW3000 (Best Overall)
Greenworks Pro GPW3000 (Best Overall)
Homeowners who want the strongest electric cleaning power without dealing with gas
Pros
- Highest PSI in an electric model at this price point
- Brushless motor for longer life and quieter operation
- Steel frame construction outlasts plastic competitors
- No gas, oil, or engine maintenance required
Cons
- At 47 lbs, heavier than most electric models
- 120V cord limits you to outlet proximity
- Flow rate drops to 1.1 GPM at rated pressure
Sun Joe SPX3000 (Best Value)
Sun Joe SPX3000 (Best Value)
Budget-conscious homeowners who need reliable cleaning for cars, decks, and patio furniture
Pros
- Exceptional value at around $170
- Dual detergent tanks for easy soap switching
- Lightweight at 31 lbs for easy portability
- PWMA-certified pressure and flow ratings
Cons
- 2030 PSI won't tackle the toughest concrete stains
- 20-foot hose is shorter than competitors
- Plastic body is less durable than steel-framed models
Final Thoughts
Learning how to pressure wash a house saves you hundreds of dollars per year in professional exterior cleaning costs, and the results speak for themselves. I genuinely believe this is one of the most satisfying home maintenance tasks you can do. A clean exterior doesn't just look better. It protects your siding, prevents mold and mildew from gaining a foothold, and maintains your home's value over time.
The keys to getting it right are straightforward: use the correct PSI for your siding type, always apply detergent from the bottom up, always rinse from the top down, and never underestimate the damage that too much pressure can cause. I'd suggest writing your siding's safe PSI range on a piece of tape and sticking it to the wand as a reminder. Start low, let the detergent do the work, and keep the wand moving.
If you're in the market for a pressure washer, our best pressure washers guide covers the top models for homeowners. Deciding between electric vs gas pressure washers? That guide breaks down the trade-offs. And if you're tackling the whole exterior of your property, pair your pressure wash with yard maintenance to get the full curb appeal boost. Your house will look like it just got a fresh coat of paint, without spending a dime on actual paint.
Affiliate Disclosure
This post contains affiliate links. As an Amazon Associate, HomeBuildLab earns from qualifying purchases at no additional cost to you. Learn more
Looking for the right tools and products?
Check out our product reviews and buying guides to find the best gear for your project.
Browse Reviews