How to Install a Smart Lock: Step-by-Step for Any Door
Quick Comparison
| Product | Best For | Buy |
|---|---|---|
 Schlage Encode Plus Smart WiFi Deadbolt (Best Overall) Schlage · Battery (4 AA) · 4.5 lbs | Homeowners who want top-tier security with full smart home compatibility | |
 Ultraloq U-Bolt Pro WiFi (Best Value) U-tec (Ultraloq) · Battery (4 AA) · 3.9 lbs | Budget-conscious buyers who want fingerprint access and maximum unlock options |
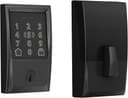
Schlage Encode Plus Smart WiFi Deadbolt (Best Overall)
Homeowners who want top-tier security with full smart home compatibility
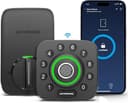
Ultraloq U-Bolt Pro WiFi (Best Value)
Budget-conscious buyers who want fingerprint access and maximum unlock options
Learning how to install a smart lock is one of the easiest home upgrades you can tackle. I think it's genuinely the best ratio of effort to impact in all of home improvement. Most people finish the job in 15 to 30 minutes with nothing more than a screwdriver. No drilling, no wiring, no electrician. If you can swap out a deadbolt, you can install a smart lock.
Here's what the intimidating product boxes don't tell you: smart locks drop into the same holes your existing deadbolt already uses. from dozens of user install experiences, the trickiest part is usually pairing the lock with an app afterward. The physical installation is genuinely simple.
This guide covers every step, from checking compatibility to setting up smart home integrations. If you haven't chosen a lock yet, start with our best smart locks roundup.
Before You Start: Check Your Door Compatibility
Before you open the box, verify that your door will accept the lock. In my opinion, skipping this step is the number one reason people end up returning smart locks.
Door thickness. Most smart locks fit standard doors between 1-3/8" and 2" thick. Measure yours. If you have a non-standard thickness (common with older homes or custom entries), check the lock's spec sheet for adapter kits.
Backset measurement. This is the distance from the edge of the door to the center of the deadbolt hole. The two standard sizes are 2-3/8" and 2-3/4". Almost every smart lock ships with both latch sizes in the box. Measure yours from the door edge to the center of the bolt.
Bore hole diameter. Standard deadbolt bore holes are 2-1/8" (54mm). If your door has this standard hole, any major smart lock brand will fit. Do not enlarge an undersized bore hole yourself, as this voids your lock warranty and compromises the door.
Deadbolt type. Most smart locks replace a standard single-cylinder deadbolt. If you have a mortise lock (common in apartments and older buildings), you'll need a mortise-specific smart lock or a retrofit model.
Door material. Wood, fiberglass, and composite doors all work fine. Metal doors can interfere with Bluetooth and WiFi signals and require self-tapping screws instead of wood screws. Check the manufacturer's compatibility notes for metal doors.
Tools You'll Need
The good news: you probably have everything already.
- Phillips screwdriver (the only tool most installations require)
- Tape measure (for verifying backset and door thickness)
- Smartphone (for app pairing and configuration)
- AA or CR123A batteries (most locks include them, but have spares handy)
That's it. No power drill, no hole saw, no special hardware. If your door already has a standard deadbolt, the holes are already there. A flathead screwdriver and pencil can help with certain models, but most installations need only the Phillips.
Step 1: Remove Your Existing Deadbolt
Start from the interior side. Remove the two screws holding the interior thumb turn plate and pull it away. Move to the exterior side and remove the screws holding the escutcheon or cylinder. Slide it out.
Finally, remove the two screws holding the latch bolt in the edge of the door and pull it straight out. Keep your old hardware in a bag in case you need to revert (useful for renters).
Step 2: Install the New Latch Bolt
Insert the new latch bolt into the hole on the edge of the door with the angled face pointing toward the door frame (the direction the door closes).
If the latch doesn't line up with your strike plate, you likely grabbed the wrong backset adapter. Most kits include both 2-3/8" and 2-3/4" options. Swap to the correct one and secure with the two provided screws. The latch plate should sit flush with the door edge.
Step 3: Install the Mounting Plate
Most smart locks use a mounting plate on the interior side of the door. This plate anchors the interior lock body and connects to the latch mechanism.
Thread any cable or connector through the bore hole from the exterior side to the interior. Align the mounting plate over the bore hole, making sure the cable passes through cleanly.
Fasten the mounting plate with the provided screws. These are long because they pass through the door and thread into the exterior escutcheon. Do not overtighten. I'd suggest snugging them until the plate doesn't wobble, then stopping right there. Overtightening warps the plate and causes the deadbolt to bind.
Step 4: Attach the Exterior Escutcheon
From the outside of the door, position the exterior keypad or key cylinder assembly over the bore hole. The tailpiece (a flat metal bar or connector) should slide through the latch bolt mechanism.
Hold the exterior piece flush against the door while you tighten the mounting plate screws from the interior side. Alternate between screws to ensure even pressure. If your lock has a keypad with a fingerprint reader, make sure it's oriented right-side up. The escutcheon often fits in either direction, and installing it upside down means the number pad reads backwards.
Step 5: Attach the Interior Lock Body
Slide the interior lock assembly onto the mounting plate. Most brands use a hook-and-slot system: align tabs on the lock body with slots on the mounting plate, then slide down until it clicks.
Some models require you to thread a cable connector from the mounting plate into the lock body before snapping it in. Don't force this connection. If the cable is pinched, the motor won't function. Secure the interior body with the provided retention screws.
Step 6: Install the Batteries
Open the battery compartment on the interior assembly and insert batteries according to the polarity markings. Most smart locks use four AA batteries and last 6 to 12 months. Some premium models use CR123A lithium batteries.
The lock should beep or flash to indicate power. If nothing happens, check for a plastic pull tab you may have missed.
Step 7: Test the Deadbolt Manually
Before you touch the app, test the physical lock mechanism. Extend and retract the deadbolt using the thumb turn (or manual knob) on the interior side. It should move smoothly without grinding, catching, or requiring excessive force.
Next, test with the door closed. Extend the bolt fully into the strike plate. If it doesn't extend completely, the strike plate is misaligned. Loosen the strike plate screws, adjust, and retighten. A bolt that doesn't fully extend drains the motor battery fast and eventually fails to lock.
Test at least 10 times. Listen for grinding or motor strain. If you hear resistance, try loosening the mounting plate screws by a quarter turn. What I find most important is that you don't skip this step. Overtightened screws cause more "defective" smart lock returns than actual defects.
Step 8: Pair with the App
Download the manufacturer's app (August, Schlage Home, Yale Access, Kwikset, or whichever brand you bought). Create an account and follow the in-app pairing instructions.
Most locks pair via Bluetooth first. Hold your phone within 12 inches of the lock during setup. The app will detect the lock, walk you through naming it, creating an access code, and calibrating the motor.
Calibration is critical. The app will ask the lock to extend and retract the bolt several times to learn the throw distance. I can't stress this enough: do this with the door closed so it calibrates against the actual resistance of your strike plate. Calibrating with the door open causes locking failures later.
Deadbolt Replacement vs. Retrofit Installation
Not all smart locks replace your entire deadbolt. Some are retrofit models that attach to the interior side of your existing hardware.
Full replacement locks (Schlage Encode, Yale Assure Lock 2, Kwikset Halo) swap both the interior and exterior hardware. You get a keypad or fingerprint reader on the outside, a smart module on the inside, and a new latch bolt. The steps above cover this type.
Retrofit locks (August Wi-Fi Smart Lock, Level Lock+) mount over your existing interior thumb turn. You keep your current key cylinder and deadbolt. Installation takes under 10 minutes: remove the thumb turn, attach the mounting plate, snap on the smart module, insert batteries.
Retrofit locks are ideal for renters or anyone who wants to keep existing keys. full replacement locks offer more features (keypads, fingerprint readers) and typically better motor reliability since the entire mechanism is designed as one unit. I'd recommend the full replacement route if you own your home and want the most seamless experience.
Setting Up the App and Smart Home Integration
Once the lock is paired, configure these settings before you walk away.
Auto-lock. Set the lock to automatically engage after a set time (usually 30 seconds to 5 minutes). I'd suggest enabling this immediately. The number one security failure with smart locks is forgetting to lock the door, and auto-lock eliminates that entirely.
Access codes. Create unique PIN codes for family members, house cleaners, and guests. Most smart locks support 50 to 250 codes. Avoid obvious PINs like 1234 or your street address.
Smart home integration. Connect your lock to your broader smart home ecosystem.
- Alexa: Enable your lock brand's Alexa skill. You can check lock status by voice but (for security) most locks require a PIN to unlock via voice.
- Google Home: Add the lock in the Google Home app under "Devices." Works similarly to Alexa.
- Apple HomeKit: Scan the HomeKit code included with your lock. Locks with HomeKit support work with Siri, Apple Home automations, and Apple Home Keys (tap your iPhone or Apple Watch to unlock).
- Matter: Newer locks support the Matter standard, which provides cross-platform compatibility without needing separate skills or apps. If your lock supports Matter, it works with all three platforms natively.
WiFi vs. Bluetooth. Bluetooth-only locks require your phone to be within about 30 feet. WiFi-enabled locks (or Bluetooth locks paired with a WiFi bridge) let you control the lock from anywhere and receive real-time notifications. If remote access matters, make sure your lock has WiFi built in or buy the companion bridge.
If you're building out a connected home, pair your smart lock with a smart thermostat for arrival-based automations. You can also connect it with a smart garage door opener so a single "I'm home" routine unlocks your front door and opens your garage simultaneously.
Common Mistakes When You Install a Smart Lock
Skipping the door compatibility check. Measure your backset, bore hole, and door thickness before ordering. A lock that doesn't fit your door is not the lock's fault.
Overtightening screws. This is the single most common installation error. Overtightened screws warp the plate and cause the deadbolt to bind. Snug plus a quarter turn is all you need.
Calibrating with the door open. Always calibrate with the door closed and latched. Open-door calibration leads to "lock jammed" errors within the first week.
Ignoring strike plate alignment. If the bolt catches or drags, fix it now. A misaligned strike plate forces the motor to work harder, draining batteries in weeks instead of months.
Not testing before closing up. Test 10 times with the door open, then 10 times closed, before putting your tools away.
Skipping firmware updates. After pairing, check the app for firmware updates immediately. Manufacturers push updates that fix motor calibration bugs and security vulnerabilities.
Using the wrong batteries. Use the battery type specified in the manual. Rechargeable batteries deliver lower voltage than alkaline cells, and many smart locks won't operate reliably on rechargeables.
Recommended Products
Ready to buy? These are the top picks from our best smart lock guide.
Schlage Encode Plus Smart WiFi Deadbolt (Best Overall)
Schlage Encode Plus Smart WiFi Deadbolt (Best Overall)
Homeowners who want top-tier security with full smart home compatibility
Pros
- ANSI/BHMA Grade AAA certification for top-tier physical security
- Apple Home Key, Alexa, and Google Assistant compatibility
- Built-in Wi-Fi with no hub required
- 100 access codes with scheduling
Cons
- Premium price at ~$299
- Bulkier interior escutcheon than some competitors
- Wi-Fi can drain batteries faster with weak signal
Ultraloq U-Bolt Pro WiFi (Best Value)
Ultraloq U-Bolt Pro WiFi (Best Value)
Budget-conscious buyers who want fingerprint access and maximum unlock options
Pros
- ANSI Grade 1 certification at under $200
- Eight unlock methods including fast fingerprint reader
- IP65 waterproof rating for exposed doors
- Built-in Wi-Fi with door sensor included
Cons
- App interface could be more intuitive
- Fingerprint reader placement feels slightly low for taller users
- No Apple HomeKit support
Final Thoughts
Learning how to install a smart lock takes less time than assembling most flat-pack furniture. The physical installation is straightforward for anyone comfortable using a screwdriver, and the app setup walks you through the rest.
I think the key to a trouble-free installation comes down to preparation: measure your door before you buy, don't overtighten anything, and always calibrate with the door closed. Follow those three rules and your lock should work flawlessly from day one. Whether you go with a full deadbolt replacement or a simple retrofit model, you'll wonder why you waited so long.
Affiliate Disclosure
This post contains affiliate links. As an Amazon Associate, HomeBuildLab earns from qualifying purchases at no additional cost to you. Learn more
Looking for the right tools and products?
Check out our product reviews and buying guides to find the best gear for your project.
Browse Reviews