How to Install a Ceiling Fan: A Step-by-Step DIY Guide
Quick Comparison
| Product | Best For | Buy |
|---|---|---|
 Hunter Crestfield 52" (Best Overall) Hunter · Corded (AC Motor) · 19 lbs | Living rooms, bedrooms, and family rooms that need reliable airflow with a classic look | |
 Westinghouse Comet 52" (Best Value) Westinghouse · Corded (AC Motor) · 17.6 lbs | Anyone who wants a reliable 52" fan with LED lighting without spending over $100 |
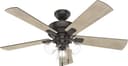
Hunter Crestfield 52" (Best Overall)
Living rooms, bedrooms, and family rooms that need reliable airflow with a classic look
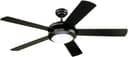
Westinghouse Comet 52" (Best Value)
Anyone who wants a reliable 52" fan with LED lighting without spending over $100
Learning how to install a ceiling fan is a solid weekend project that most homeowners can handle. I think it's one of the most satisfying DIY upgrades you can do because the payoff is immediate: better airflow, lower energy bills, and a room that just feels more finished. If you're replacing an existing light fixture with a fan, the wiring is already in place and the job typically takes one to two hours. If you're adding a fan where no fixture exists, the complexity jumps significantly because you'll need to run new wiring and cut into the ceiling.
Here's the truth: the actual installation is straightforward. The part that trips people up is the electrical box. this is where the majority of ceiling fan installation failures originate. A standard light fixture box cannot support the weight and vibration of a ceiling fan. Skip this step and you risk a 30-pound motor crashing down from your ceiling. That's not a scare tactic. It happens more often than you'd think.
This guide covers how to install a ceiling fan from start to finish, walking you through every step from killing the power to testing the finished fan. If you haven't picked your fan yet, check out our best ceiling fans roundup for top picks across every room size and budget.
Before You Start: Ceiling Fan Electrical Box Requirements
This is the single most important step in the entire installation. What I find most important is getting this right before anything else. Per NEC 314.27(C), any outlet box used as the sole support for a ceiling fan must be listed and marked as suitable for that purpose. In plain terms: you need a fan-rated electrical box.
How to tell if your existing box is fan-rated. Remove the canopy of your current light fixture and look at the box. Fan-rated boxes are typically metal (not plastic) and will have a label or stamp reading "Acceptable for Fan Support" or similar language. If the box is unmarked, assume it's not rated and replace it.
Weight limits matter. Standard fan-rated boxes support fans up to 70 lbs. If your fan exceeds 35 lbs, the box must be specifically marked with the maximum supported weight. Most residential ceiling fans weigh between 15 and 50 lbs, so check your fan's spec sheet before selecting a box.
New-work vs. old-work boxes. If your ceiling is open (like during a renovation), a new-work box nails directly to a joist. For retrofit installations with drywall already in place, an old-work (remodel) fan-rated brace bar expands between joists from inside the box hole. In my opinion, these brace kits are the best option for most homeowners because they're widely available at home improvement stores and don't require attic access.
Tools and Materials You'll Need
Before you learn how to install a ceiling fan, gather everything you need. Nothing is worse than making three trips to the garage while balancing on a stepladder.
Tools:
- Voltage tester (non-contact type is fastest)
- Phillips and flathead screwdrivers
- Wire strippers/cutters
- Adjustable wrench or socket set
- Pliers (needle-nose preferred)
- Step ladder (tall enough to work comfortably at ceiling height)
- Cordless drill (helpful for driving screws into the mounting bracket)
Materials:
- Ceiling fan (with all included hardware)
- Fan-rated electrical box or brace bar kit (if replacing)
- Wire nuts (usually included with the fan)
- Electrical tape
Step 1: Turn Off the Power
The first real step in how to install a ceiling fan safely is cutting the power. Go to your electrical panel and flip the breaker that controls the ceiling fixture circuit. Do not rely on the wall switch alone. Switches can be miswired, and someone else in the house could flip it back on while you're working.
After turning off the breaker, use your non-contact voltage tester at the existing fixture to confirm the power is dead. Test both the black (hot) and white (neutral) wires. If the tester lights up or beeps, you have the wrong breaker. Go back and try again. I'd suggest testing twice, even if the first reading shows no power. This is non-negotiable.
Step 2: Remove the Existing Fixture
Unscrew the canopy or globe of your old light fixture to access the mounting hardware. Remove the screws or nuts holding the fixture to the electrical box. Carefully lower the fixture and disconnect the wire nuts connecting the house wires to the fixture wires.
Support the fixture while disconnecting. If you're working alone, a coat hanger hook through the electrical box can hold a lightweight fixture while you free up both hands.
Step 3: Inspect or Replace the Electrical Box
With the old fixture removed, inspect the box. If it's a small plastic box, it absolutely must be replaced with a fan-rated box. Even some metal boxes aren't fan-rated, so look for the marking.
To install a retrofit fan brace bar: Remove the old box. Insert the expandable brace bar through the hole in the ceiling and position it between two joists. Rotate the bar until the teeth bite into the joists on both sides and it's snug. Attach the fan-rated box to the center of the brace bar with the provided U-bolt hardware.
This step is the most physically awkward part of the job. You're working overhead in a tight space. From common ceiling fan installation problems, a loose brace bar is one of the top reasons fans wobble or fail. Take your time and make sure the brace is solid before moving on.
Step 4: Assemble the Fan Components
A key step in how to install a ceiling fan efficiently is doing as much assembly on the ground as possible. This means attaching the downrod to the motor housing, feeding the fan wires through the downrod, and securing the downrod with the provided cotter pin or set screw.
If your fan includes a light kit, do not attach it yet. It's much easier to hang the motor assembly first and add the light kit after the fan is secured to the ceiling. Attach the fan blades to their blade brackets (blade irons) as well. Having these ready saves time once the motor is mounted.
Step 5: Install the Mounting Bracket
The mounting bracket (also called the ceiling plate or hanger bracket) attaches to the fan-rated electrical box with the screws provided. Feed the house wires through the center opening of the bracket before securing it.
Tighten the bracket screws firmly. The bracket supports the entire weight of the fan, so it needs to sit flat and secure against the box. Give it a firm tug after tightening to confirm it doesn't move. Some brackets feature a ball-and-socket design for standard downrod fans, while others use a J-hook that lets you hang the motor temporarily while wiring.
Step 6: Hang the Motor and Connect the Wiring
Lift the motor assembly up to the ceiling and seat the downrod ball into the mounting bracket socket. If your bracket has a J-hook, hang the motor on it first so your hands are free for wiring.
Standard wiring connections (single switch):
- Black to black: Connect the fan's black wire to the house's black (hot) wire using a wire nut.
- White to white: Connect the fan's white wire to the house's white (neutral) wire.
- Green to green/bare copper: Connect the fan's green ground wire to the house's ground wire (green or bare copper). Also ground to the mounting bracket if it has a ground screw.
- Blue wire (if present): This controls the light kit. For a single switch setup, connect the blue wire to the black hot wire along with the fan's black wire.
Tug each connection after twisting on the wire nut to make sure it's solid. Wrap electrical tape around each wire nut for added security. I think this extra wrapping step is worth the 30 seconds it takes. Loose connections cause intermittent power issues and are a fire hazard.
Step 7: Secure the Canopy
Tuck all wiring neatly into the electrical box and lift the canopy (the decorative cover that hides the box and wiring) into position against the ceiling. Secure it with the provided screws or locking mechanism.
The canopy should sit flush against the ceiling. If it's crooked or there's a visible gap, you likely have a wire bunched behind it or the mounting bracket isn't seated properly. Loosen, adjust, and re-tighten.
Step 8: Attach the Fan Blades
With the motor securely mounted, attach each blade bracket to the motor using the provided screws. Most fans have three to five blades. Hand-tighten first, then snug with a screwdriver. Do not overtighten, as this can strip the screw holes in the motor housing.
If your blades have a specific orientation (curved or angled), make sure they all face the same direction. This seems obvious, but one reversed blade creates noticeable wobble and noise.
Step 9: Install the Light Kit (If Applicable)
Remove the cover plate on the bottom of the fan motor to expose the light kit wires. Connect the light kit wires to the corresponding fan wires (typically blue to blue and white to white), secure with wire nuts, and tuck the connections into the housing.
Attach the light kit to the bottom of the motor per the manufacturer's instructions. Install the bulbs and any glass shades. LED bulbs are strongly recommended for ceiling fans because they produce less heat and last significantly longer than incandescent options.
Step 10: Test Everything
You're nearly done learning how to install a ceiling fan. Restore power at the breaker panel. Turn on the wall switch and test the fan at each speed setting. Let it run for at least 10 minutes and watch for wobble. A slight wobble is normal and can be corrected with a blade balancing kit (most fans include one). Significant wobble usually means a loose blade bracket or an unbalanced blade.
Test the light kit separately if you have dual controls. Verify that the pull chains (if present) and any remote control operate correctly. Confirm the fan direction switch works: counterclockwise in summer (pushes air down) and clockwise in winter (recirculates warm air without a direct breeze).
Standard Mount vs Flush Mount vs Angled Mount
When you install a ceiling fan, not every ceiling is the same. Matching the right mount type to your room matters for both performance and safety.
Standard downrod mount. This is the most common type. The fan hangs from a downrod (typically 3 to 5 inches long) below the mounting bracket. Best for ceilings 8 to 9 feet high. The ideal blade height is 8 to 9 feet from the floor and at least 7 feet for safety clearance.
Flush mount (hugger mount). The motor attaches directly to the mounting bracket with no downrod. Designed for ceilings under 8 feet. The tradeoff: flush-mounted fans move less air because the blades sit closer to the ceiling, which restricts airflow. If your ceiling is 8 feet or higher, a standard mount will always outperform a hugger.
Angled/sloped mount. For vaulted or cathedral ceilings, you need an angled mounting kit (sometimes called a sloped ceiling adapter). These kits allow the downrod to hang plumb even when the ceiling is pitched. Most fans support slopes up to 30 degrees with an adapter. Beyond that, you'll need a longer downrod and a specialized adapter from the manufacturer.
Dual-mount (convertible). Many modern fans include hardware for both standard and flush mounting. These are a smart choice if you're unsure which mount type you need or if you might move the fan to a different room later.
Wiring Configurations: One Switch, Two Switches, or Remote
Understanding your wiring options is an important part of knowing how to install a ceiling fan. The wiring you choose determines how you control the fan and light independently. Here's how each option works.
Single switch (most common). One wall switch controls power to the entire fan. You use pull chains on the fan itself to switch between fan speeds and toggle the light on or off. This is the simplest wiring setup and works with any existing single-switch junction box.
Two separate switches. This requires a three-wire cable (black, red, white, plus ground) running from the switch box to the ceiling box. The black wire powers the fan motor, the red wire powers the light kit, and white remains neutral. Each switch operates independently. If your house only has a two-wire cable to the ceiling, running a new three-wire cable is the cleanest solution, but it does involve fishing wire through walls.
Remote control. A remote receiver module sits inside the fan canopy and connects between the house wiring and the fan. You only need a single hot wire from the wall switch. The remote sends RF signals to the receiver, letting you control fan speed, light dimming, and direction without pull chains or a second switch. Many newer fans come with remotes included. In my opinion, this is the best retrofit option when you don't want to run additional wiring, and it makes your ceiling fan installation feel much more modern.
If you're also upgrading your home's climate control, pairing a ceiling fan with a smart thermostat can cut your energy bills. Running the fan lets you raise the thermostat setting by 4 degrees without losing comfort.
Common Ceiling Fan Installation Mistakes to Avoid
Using a non-fan-rated box. If you're figuring out how to install a ceiling fan, this is the biggest and most dangerous mistake to avoid. A standard light fixture box will eventually fail under the weight and vibration of a ceiling fan. Replacing it later means redoing the entire installation.
Not verifying the power is off. Always use a voltage tester. Wall switches don't guarantee the circuit is dead.
Overtightening screws. This strips threads in the motor housing, warps the mounting bracket, and causes wobble. Snug is enough.
Skipping the ground wire. The ground wire is a safety requirement, not optional. A ceiling fan with a metal motor housing that isn't grounded is a shock hazard.
Ignoring wobble. Some wobble is normal out of the box. Use the blade balancing kit to fix it. Persistent wobble after balancing usually points to a loose bracket or a warped blade.
Choosing the wrong fan size. A 42-inch fan in a 400-square-foot room won't move enough air. Match the fan diameter to the room: 36 inches for rooms up to 75 sq ft, 42 inches for up to 144 sq ft, 52 inches for up to 225 sq ft, and 60+ inches for larger spaces.
When to Call an Electrician
A DIY ceiling fan installation is perfectly reasonable when you're replacing an existing fixture. But certain situations call for a licensed electrician. I'd suggest being honest with yourself about where your comfort level ends.
No existing ceiling wiring. Running new electrical cable through walls and ceilings requires knowledge of load calculations, junction boxes, and local building codes. This is not a beginner project.
Aluminum wiring. Homes built in the 1960s and 1970s may have aluminum wiring. Aluminum requires special connectors (CO/ALR rated) and techniques. Mixing aluminum and copper without proper connectors creates a serious fire risk.
Uncertainty about the box. If you can't determine whether the existing box is fan-rated and can't easily access it (for example, in a concrete ceiling or with no attic access above), hire a professional.
Multiple fan installations on the same circuit. Adding several fans to one circuit can overload it. An electrician can verify the circuit capacity and add dedicated circuits if needed.
Permits. Some jurisdictions require electrical permits for fan installations, especially new installations. Check with your local building department.
Recommended Products
Ready to buy? These are the top picks from our best ceiling fan guide.
Hunter Crestfield 52" (Best Overall)
Hunter Crestfield 52" (Best Overall)
Living rooms, bedrooms, and family rooms that need reliable airflow with a classic look
Pros
- 5,398 CFM airflow handles rooms up to 400 sq. ft.
- WhisperWind motor is genuinely quiet
- 1,800-lumen dimmable LED light kit serves as primary room lighting
- Available in multiple finishes (Noble Bronze, Brushed Nickel, Fresh White)
Cons
- Pull chain control only (no remote included, though a universal remote can be added)
- AC motor uses more energy than DC alternatives
- Low-profile mount option sits blades close to ceiling, reducing efficiency slightly
Westinghouse Comet 52" (Best Value)
Westinghouse Comet 52" (Best Value)
Anyone who wants a reliable 52" fan with LED lighting without spending over $100
Pros
- Under $100 makes it the best value 52" fan on this list
- Dimmable 16W LED light with frosted glass for even illumination
- Reversible blades and multiple finish options
- Lifetime motor warranty at a budget price
Cons
- Pull chain control only (remote sold separately)
- 3,589 CFM is adequate but not exceptional for 52" span
- Motor noise is noticeable on the highest speed setting
Final Thoughts
Knowing how to install a ceiling fan puts you ahead of the average homeowner. It's a project that saves $150 to $300 in electrician labor costs and takes most people about 90 minutes once the parts are laid out. I think the key is respecting the electrical safety steps (kill the power, test twice, use a fan-rated box) and taking your time with the wiring connections.
Start with the right fan for your room size, confirm your electrical box is up to the task, and follow the steps in order. If anything about the wiring feels unclear or unsafe, there's no shame in calling a pro. But for a straightforward replacement of an existing fixture, learning how to install a ceiling fan yourself is one of the most rewarding DIY upgrades you can do.
Need a fan recommendation? Browse our best ceiling fans guide. If you're looking for a reliable drill to speed up the mounting bracket work, our best cordless drills roundup has you covered. Now that you know how to install a ceiling fan, bookmark this page for reference on your next project.
Affiliate Disclosure
This post contains affiliate links. As an Amazon Associate, HomeBuildLab earns from qualifying purchases at no additional cost to you. Learn more
Looking for the right tools and products?
Check out our product reviews and buying guides to find the best gear for your project.
Browse Reviews