How to Use a Stud Finder (+ How They Work)
Quick Comparison
| Product | Best For | Buy |
|---|---|---|
 Franklin Sensors ProSensor M210 (Best Overall) Franklin Sensors · Battery (2 AA, not included) · 7.2 oz (without batteries) | Anyone who wants the most accurate, easiest-to-use stud finder available | |
 Ryobi ESF5002 Whole Stud Finder (Best Value) Ryobi · Battery (2 AAA, included) · 5.3 oz | DIYers who want full-width stud detection without spending $50+ |
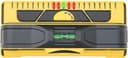
Franklin Sensors ProSensor M210 (Best Overall)
Anyone who wants the most accurate, easiest-to-use stud finder available
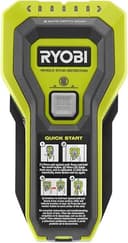
Ryobi ESF5002 Whole Stud Finder (Best Value)
DIYers who want full-width stud detection without spending $50+
Knowing how to use a stud finder is the difference between a TV mount that holds for years and one that rips out of the wall at 2 a.m. Whether you're hanging floating shelves, installing a ceiling fan, or mounting heavy cabinetry, everything depends on hitting solid wood behind the drywall. Miss the stud, and drywall anchors are your only backup. For anything over 20 pounds, that's not a backup you want to rely on.
Here's the truth: most people who complain about stud finders aren't using them correctly. They skip calibration, move too fast, or don't understand what kind of stud detector they have. I think the tool itself is one of the simplest in any homeowner's toolkit. The technique matters more than the price tag.
This guide covers how stud finders actually work, step-by-step instructions for both electronic and magnetic models, and the common mistakes that cause false readings. If you haven't picked a wall scanner yet, check out our best stud finders roundup for top picks at every price point.
How Stud Finders Work: Three Technologies Explained
Before you scan a single wall, understanding what's happening inside your stud sensor will make you a better user. There are three main technologies, and each one locates studs differently.
Magnetic Stud Finders
Magnetic stud finders are the simplest type. They don't use batteries or electronics. Instead, a strong magnet (usually a rare-earth neodymium magnet) detects the metal fasteners, such as nails and screws, that hold drywall to the studs behind it.
When you slide a magnetic finder across the wall, you'll feel it tug or "grab" when the magnet passes over a hidden fastener. That fastener is driven into a stud, so where you feel the pull, there's wood behind the wall.
Strengths: No batteries, no calibration, never gives false electronic readings. Works on any wall surface, including textured walls and plaster.
Limitations: Finds fasteners, not the stud itself. You know a stud is there, but you don't know its exact edges. Also can't detect pipes, wiring, or non-metallic objects.
Electronic Stud Finders
Electronic stud finders are the most common type sold today. They use capacitive sensors to measure changes in the wall's dielectric constant (the density of material behind the surface). When the sensor passes over an area where solid wood sits behind the drywall, the density reading spikes. When it passes over empty cavity space, the reading drops.
Electronic models come in three varieties:
- Edge finders detect where a stud begins and ends. You mark both edges, then measure to the center.
- Center finders use multiple sensors to pinpoint the stud's center directly.
- Instant (full-width) finders use a row of sensors (sometimes 13 or more) to display the full width of the stud in real time.
Most electronic models also include a wire-warning feature that detects live AC wiring behind the wall. This is a safety bonus, though it shouldn't replace a dedicated voltage tester for electrical work.
Radar-Based Stud Finders
Radar stud finders represent the newest technology. They emit small pulses of radio-frequency energy into the wall and analyze the reflections to build a picture of what's behind the surface. Some models (like the Walabot DIY 2) connect to your smartphone and display a visual image of studs, pipes, and wires on your screen.
Radar models can see deeper into walls and distinguish between different materials (wood, metal, plastic pipe). They work through thicker wall assemblies, including plaster and lath, where electronic models sometimes struggle.
The tradeoff is cost. Radar stud finders typically start around $100 and go up from there. For most homeowners hanging shelves and TVs, an electronic or magnetic finder handles the job.
How to Use an Electronic Stud Finder: Step by Step
Electronic stud finders are the most popular choice, so let's start here. These steps apply to most edge-finding and center-finding models.
Step 1: Check Your Batteries
This sounds obvious, but low batteries are the number-one cause of erratic stud finder behavior. inconsistent readings and random beeping almost always trace back to dying batteries. Replace them before blaming the tool. Fresh alkaline batteries give the most consistent performance.
Step 2: Choose Your Starting Position
Place the stud finder flat against the wall at the height where you plan to drill or drive screws. Start at least 12 inches from the corner of the wall, since corners almost always contain studs and can throw off calibration.
Avoid starting near electrical outlets, light switches, or HVAC vents. These areas contain metal junction boxes and wiring that will confuse the sensor.
Step 3: Calibrate the Device
Most electronic stud finders calibrate automatically when you press the power button while holding the device flat against the wall. The sensor takes a baseline reading of the "empty" wall (drywall over open cavity). Some models require you to hold a button for two to three seconds until an LED or screen confirms calibration is complete.
Critical detail: calibrate on a spot where there is no stud. If you accidentally calibrate over a stud, the tool will think "solid wood" is normal and won't alert you when it finds one. In my opinion, this is the single biggest mistake beginners make. If you're getting no readings at all, try recalibrating a few inches to the left or right.
Also, keep your hand position consistent after calibrating. Some models factor in hand placement during calibration. Shifting your grip mid-scan can produce false readings.
Step 4: Scan Slowly in One Direction
Hold the stud finder flat and level against the wall. Slide it horizontally at a slow, steady pace. I'd suggest thinking one inch per second, not a quick swipe. Moving too fast is the most common user error. The sensor needs time to register density changes.
When the device detects a stud edge, it will beep, light up, or display an indicator. Stop and mark this spot with a pencil. This is one edge of the stud.
Step 5: Scan from the Opposite Direction
Lift the stud finder off the wall. Move it about 12 inches past the mark you just made. Recalibrate (press the button again), and scan back toward your first mark. When the device signals again, mark this second spot. This is the other edge of the stud.
The center of the stud is halfway between your two marks. Standard wood studs are 1.5 inches wide, so your two edge marks should be roughly 1.5 inches apart. If they're more than 2 inches apart, you may be picking up a pipe, doubled stud, or other object. If they're only a half-inch apart, you may have found a nail or screw rather than a stud edge.
Step 6: Verify the Stud Location
Never drill based on a single scan. What I find most important is verifying by checking for the next stud in line. Standard residential framing spaces studs 16 inches on center (measured from the center of one stud to the center of the next). Some older homes and certain wall types use 24-inch spacing.
Measure 16 inches from your marked center point and scan again. If you find another stud right at 16 inches, you can be confident both readings are accurate. If the next stud is at an irregular distance, double-check your first mark or consider that you may be picking up plumbing or wiring instead.
Step 7: Confirm with a Small Nail
If you want absolute certainty before drilling a large hole or driving a heavy-duty lag bolt, drive a small finish nail into the wall at your marked center point. If the nail hits solid wood after penetrating the drywall (about 1/2 inch in), you've confirmed the stud. If the nail pushes through easily with no resistance, you missed the stud. Move your mark slightly and try again.
A cordless drill with a 1/16-inch bit works for this verification step too. The small hole is easy to patch with spackle if you need to adjust.
How to Use a Magnetic Stud Finder: Step by Step
Magnetic stud finders are even simpler, but the technique is slightly different because you're finding fasteners, not stud edges.
Step 1: Place the Finder on the Wall
Hold the magnetic stud finder flat against the wall. No calibration needed, no batteries to check.
Step 2: Sweep in an S-Pattern
Instead of a straight horizontal line, move the magnetic finder in a slow S-shaped or zigzag pattern. This covers more vertical area and increases your chances of crossing a nail or screw line. Fasteners are spaced vertically along each stud (typically every 12 to 16 inches), so a straight horizontal sweep could pass between them and miss entirely.
Step 3: Feel for the Pull
When the magnet passes over a hidden screw or nail, you'll feel a distinct tug. The finder may even stick to the wall. Mark this spot with a pencil.
Step 4: Find the Vertical Fastener Line
Once you've located one fastener, slide the finder vertically (straight up or down) from that point. You should find additional fasteners every 12 to 16 inches along the same vertical line. When you can trace a line of two or three fasteners, you've confirmed the stud's location.
Step 5: Locate the Stud Center
Each fastener is driven into the center of the stud (or close to it). So the center of the magnetic pull point is approximately the center of the stud. Mark it and you're ready to drill.
Tips for Accurate Stud Finding Every Time
Even with proper technique, certain situations can trip up a stud finder. After researching hundreds of user complaints and forum posts, I've found that these tips help you get reliable results in tricky conditions.
Scan at the height where you'll actually drill. Studs can be slightly bowed or shifted at different heights. A reading at waist level doesn't guarantee the stud is in exactly the same position at shoulder height. Always scan at your intended fastening height.
Use multiple passes. Scan the same area two or three times to confirm consistency. If you get a different reading each time, recalibrate and try again. A consistent beep in the same spot across multiple passes is reliable. A wandering signal is not.
Avoid scanning near metal. Electrical outlets, light switches, plumbing stacks, HVAC ducts, and corner bead all contain metal that can trigger false readings. Give outlets and switches at least a 6-inch buffer zone when scanning.
Slow down on textured walls. Popcorn ceilings, orange peel texture, and knockdown finishes create uneven contact between the sensor and the wall surface. Move even more slowly than usual and press the finder firmly against the surface to maintain consistent contact.
Try multiple stud detector types. If you're struggling with plaster and lath walls, an electronic model may give unreliable results. I'd suggest trying a strong magnetic finder on plaster, since it detects the lath nails directly rather than trying to read density changes through a thick, uneven wall surface.
Common False Readings and How to Avoid Them
False positives (the finder beeps, but there's no stud) are the most frustrating part of using a stud finder. Understanding the causes helps you troubleshoot.
Metal pipes and conduit. Both copper and steel plumbing can trigger electronic stud finders. The giveaway: a pipe reading often appears at an unusual distance from nearby studs (not at 16 or 24 inches). Scan vertically along the suspected stud. A real stud runs floor to ceiling. A pipe may change direction or stop.
Electrical wiring. Romex wiring runs horizontally and vertically through wall cavities. Electronic finders with AC detection will flag live wires with a separate indicator. Pay attention to this. A stud reading combined with a wire warning could be a stud with wiring stapled to it (normal), or it could be wiring alone running through an open cavity.
Metal corner bead. Where two walls meet at an outside corner, a metal strip called corner bead protects the drywall edge. This will consistently trigger stud finders near corners. Move at least 4 inches away from any outside corner before trusting a reading.
Moisture. Damp drywall changes the dielectric constant of the wall, which confuses electronic sensors. If you're scanning a bathroom wall, basement wall, or any area with potential moisture, be aware that readings may be less reliable. Let the wall dry before scanning, or use a magnetic finder instead.
Calibrating over a stud. If you pressed the power button while the finder was sitting directly on a stud, the sensor thinks that density is the baseline "empty wall." Everything after that reads wrong. Recalibrate on a confirmed empty section (tap the wall and listen for the hollow sound as a quick check).
Low batteries. I mentioned this earlier, but it's worth repeating. Dying batteries produce erratic behavior that looks like user error. If a wall scanner that worked fine last month is suddenly unreliable, swap the batteries before doing anything else.
What to Do After You Find the Stud
Finding the stud is only half the job. Here's how to use that information effectively.
Mark clearly. Use a pencil (not a pen or marker). Draw a small X at the stud center. If you're hanging something that requires multiple fasteners, mark the stud location at every fastening point.
Use painter's tape for clean marking. If you don't want pencil marks on your wall, apply a strip of painter's tape at your scanning height. Mark the stud locations on the tape. When you're done drilling, peel off the tape for a clean wall.
Choose the right fastener. Once you've confirmed a stud, use a wood screw long enough to penetrate at least 1 inch into the stud after passing through the drywall (typically 1/2 inch thick) and your mounting bracket. For heavy loads like TV mounts, 3-inch lag bolts or structural screws are the standard.
Pre-drill for heavy mounts. For lag bolts and large screws, pre-drill a pilot hole slightly smaller than the screw shaft. This prevents the stud from splitting and makes driving the fastener much easier. A pilot hole also confirms the stud is exactly where you think it is before committing to the final fastener.
When you can't find a stud where you need one. Sometimes the stud just isn't where your shelf bracket needs to go. In these cases, use a toggle bolt or snap toggle rated for the weight you're hanging. These anchors spread the load across the back of the drywall and can hold 50 to 75 pounds per anchor in 1/2-inch drywall. For anything heavier than that, though, rethink the placement and find a stud.
Recommended Tools
Ready to buy? These are the top picks from our best stud finder guide.
Franklin Sensors ProSensor M210 (Best Overall)
Franklin Sensors ProSensor M210 (Best Overall)
Anyone who wants the most accurate, easiest-to-use stud finder available
Pros
- 13 sensors show the full width of studs instantly, no calibration needed
- Live wire detection meter adds a genuine safety feature
- Built-in bubble level and center indicator for precise marking
- Made in the USA with consistent build quality
Cons
- No metal-specific scanning mode (detects metal studs, but can't distinguish metal from wood)
- Batteries not included
- Costs roughly double the price of basic electronic stud finders
Ryobi ESF5002 Whole Stud Finder (Best Value)
Ryobi ESF5002 Whole Stud Finder (Best Value)
DIYers who want full-width stud detection without spending $50+
Pros
- Full-width LED display shows the entire stud, not just edges
- Built-in stud marker eliminates the need for a separate pencil
- Auto Depth Scan adjusts for different wall thicknesses automatically
- Batteries included in the box
Cons
- No AC wire detection (a significant omission for anyone drilling into walls)
- Limited to 1.5 inches of scanning depth
- Cannot detect pipes or other non-stud objects
Final Thoughts
Learning how to use a stud finder is a basic skill that pays off on nearly every home improvement project. I think the process boils down to three steps: calibrate on empty wall space, scan slowly, and verify your readings before drilling. Whether you're using a $10 magnetic finder or a $200 radar scanner, the technique matters more than the technology.
Start with the 16-inch rule. Once you locate one stud, the next one is almost always 16 inches away. using that pattern to confirm your readings is the fastest way to catch false positives before they cost you a wall repair.
If you're shopping for a stud finder, our best stud finders roundup covers top picks from budget magnetic models to advanced radar scanners. And when you're ready to drive those screws, a good cordless drill makes the job fast and painless.
Affiliate Disclosure
This post contains affiliate links. As an Amazon Associate, HomeBuildLab earns from qualifying purchases at no additional cost to you. Learn more
Looking for the right tools and products?
Check out our product reviews and buying guides to find the best gear for your project.
Browse Reviews