How to Choose the Right Drill Bit: A No-Nonsense Guide for Every Material
Quick Comparison
| Product | Best For | Buy |
|---|---|---|
 DeWalt DCD791D2 20V MAX XR Brushless Drill/Driver (Best Overall) DeWalt · Cordless · 3.4 lbs (with battery) | The all-around performer for serious DIYers and contractors | |
 WEN 4214T 12-Inch Variable Speed Drill Press (Best Overall) WEN · Corded · 59 lbs | Woodworkers who want precise variable speed and a large chuck without spending $400+ |
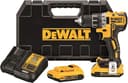
DeWalt DCD791D2 20V MAX XR Brushless Drill/Driver (Best Overall)
The all-around performer for serious DIYers and contractors
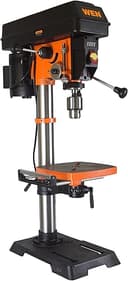
WEN 4214T 12-Inch Variable Speed Drill Press (Best Overall)
Woodworkers who want precise variable speed and a large chuck without spending $400+
Most people grab whatever drill bit is closest and hope for the best. That works until you shatter a tile, burn through a piece of hardwood, or snap a bit inside a concrete wall. I have done all three of those things, and every single time it was because I grabbed the wrong bit. Knowing how to choose the right drill bit saves you time, money, and a lot of frustration.
Here is the truth: there is no single drill bit that does everything well. Each type is engineered for specific materials, and using the wrong one does not just give you a sloppy hole. It can ruin your workpiece, destroy the bit, or even be dangerous. I believe the good news is that once you understand the basic categories, choosing becomes straightforward.
This guide breaks down every major drill bit type, explains what materials and coatings actually matter, and shows you exactly which bit to reach for based on the material you are drilling into. Whether you are hanging shelves, running electrical, or building furniture, you will know the right bit for the job before you pull the trigger on your cordless drill.
Drill Bit Types Explained
Not all drill bits are created equal. Each design solves a different problem, and understanding what makes them unique is the first step toward cleaner, faster holes.
Twist Bits
The most common drill bit you will encounter. Twist bits have a pointed tip and spiral flutes that channel debris out of the hole as you drill. They work in wood, metal, and plastic, making them the default option in most drill bit sets. Standard twist bits are fine for general-purpose work, but they are not ideal for any single material. Think of them as the utility infielder of drill bits: competent everywhere, elite nowhere.
Brad Point Bits
These are purpose-built for wood. Brad point bits have a sharp center point that digs into the surface before the cutting edges engage, which prevents the bit from wandering. The result is a cleaner, more precise hole than a twist bit can deliver in wood. In my opinion, if you do any amount of woodworking, a set of brad point bits is worth every penny.
Spade (Paddle) Bits
Spade bits have a flat, paddle-shaped tip with a center point. They cut large holes in wood quickly and cheaply, which makes them popular for rough carpentry, running wiring through studs, and plumbing work. The trade-off is that they leave a rougher hole than other options. For anything visible, choose a Forstner bit instead.
Forstner Bits
Forstner bits create flat-bottomed, clean-edged holes in wood. They are the go-to for dowel joints, hinge cups, and any hole that needs to look good or stop at a precise depth. They work best in a drill press because they require steady, even pressure. Using one freehand is possible but takes practice.
Hole Saws
A hole saw is a cylindrical blade that attaches to an arbor and cuts large-diameter holes (typically 3/4 inch to 6 inches). They work in wood, drywall, thin metal, and plastic. You will use these for doorknob installations, recessed lighting, and running large cables or pipes through walls.
Masonry Bits
Masonry bits have a carbide-tipped, chisel-shaped point designed to crush and pulverize hard materials like brick, concrete, and stone. The wide flutes clear dust efficiently. For best results, use them with a hammer drill, which adds a percussive action that dramatically speeds up the process. A standard drill in rotary-only mode will work on softer masonry, but you will be there a while.
Step Bits
Step bits (also called unibit or cone bits) have a conical shape with graduated steps, each step corresponding to a specific hole diameter. They are excellent for drilling clean holes in sheet metal, electrical boxes, and thin materials where a standard twist bit might catch or tear. One step bit replaces an entire set of individual bits for thin stock.
Auger Bits
Auger bits have deep, aggressive flutes and a threaded tip that pulls the bit into the material. They bore large, deep holes in wood quickly. Electricians and plumbers use them constantly for running wires and pipes through framing lumber. They are overkill for furniture and finish work, but unbeatable for rough construction.
Drill Bit Materials and Coatings
The steel a bit is made from determines how long it lasts, what it can cut, and how much heat it can handle. Coatings add another layer of performance on top of the base material.
High-Speed Steel (HSS)
HSS is the baseline for modern drill bits. It is tougher than plain carbon steel and resists heat well enough for wood, plastic, and soft metals like aluminum. Most affordable drill bit sets are HSS. I recommend HSS as perfectly adequate for general home improvement work.
Cobalt (HSS-Co)
Cobalt bits are HSS with 5% to 8% cobalt alloyed into the steel (not just coated on the surface). This makes them significantly harder and more heat-resistant than standard HSS. Cobalt is the right choice for drilling stainless steel, cast iron, and other hard metals. Expect to pay two to three times the price of standard HSS bits, but I think the performance difference in hard metals is dramatic and well worth it.
Carbide-Tipped
Tungsten carbide is extremely hard (nearly as hard as diamond on the Mohs scale), but it is also brittle. That is why most carbide drill bits only have carbide tips brazed onto a steel body. Carbide-tipped bits are standard for masonry and concrete, and they excel in abrasive materials that would destroy softer bits. They are also common in specialized bits for tile and cement board.
Titanium Nitride (TiN) Coating
A gold-colored titanium nitride coating reduces friction and helps bits stay sharp 30% to 50% longer than uncoated HSS. The coating is thin, so once it wears through (which happens if you resharpen the bit), it is gone. Personally, I prefer titanium-coated bits as an upgrade over plain HSS for general use, especially if you drill a lot of metal.
Black Oxide Coating
Black oxide is a mild surface treatment that reduces friction and provides some corrosion resistance. It is the most affordable coating and adds a modest boost to bit life. Many mid-range drill bit sets use black oxide as a baseline finish.
How to Choose the Right Drill Bit for Each Material
This is the section that matters most. Choosing the wrong bit for your material is the number one mistake, and it is the easiest one to avoid.
Wood
For general holes, use brad point bits for clean results or twist bits for quick, rough work. For large holes, use spade bits for speed or Forstner bits for precision. For deep, large holes through framing, use auger bits. HSS or carbon steel is fine for the bit material, since wood does not generate extreme heat.
Metal
Use HSS twist bits for aluminum, brass, and mild steel. Step up to cobalt bits for stainless steel, hardened steel, and cast iron. I'd pick a step bit as your best friend for sheet metal. Always use a center punch to create a starting point, and use cutting oil to reduce heat and extend bit life. Slow and steady wins every time with metal.
Masonry and Concrete
Use carbide-tipped masonry bits, ideally paired with a hammer drill set to the hammer-drill mode. For standard concrete, a standard masonry bit will handle most residential jobs (anchors, tapcon screws, wall mounts). For reinforced concrete or stone, look for SDS-plus bits designed for rotary hammer drills.
Tile and Glass
This is where most people make expensive mistakes. I'd recommend taking your time with tile more than any other material on this list. For ceramic tile, a carbide-tipped spear-point bit (often sold as a glass and tile bit) will get the job done. For porcelain and glass, step up to diamond-tipped bits, which grind through the material rather than cutting it. Always start slow, use light pressure, and keep the area wet. Never use hammer mode on tile; the percussion will crack it.
Plastic
Standard HSS twist bits work well in most plastics. The key is to use a lower speed and let the bit do the work. Too much speed generates heat, which melts the plastic and clogs the flutes. For acrylic and polycarbonate, brad point bits or special plastic-cutting bits with a steeper rake angle give the cleanest results.
How to Read Drill Bit Sizes
Drill bit sizing can be confusing because there are multiple systems in common use. Here is what you need to know.
Fractional Inch Sizes
In the United States, most consumer drill bit sets use fractional inch sizing. Common sizes range from 1/16 inch up to 1/2 inch for standard sets, with larger sets going up to 1 inch or more. The increments are typically 1/64 inch for smaller bits and 1/32 inch for larger ones. The most frequently used sizes for home projects are 1/8, 3/16, 1/4, 5/16, 3/8, and 1/2 inch.
Metric Sizes
Metric drill bits are measured in millimeters. If you are working with European hardware or metric fasteners, you will need metric bits. Common metric sizes include 3mm, 4mm, 5mm, 6mm, 8mm, 10mm, and 12mm. Many quality drill bit sets include both fractional and metric sizes.
How to Measure
The size printed on a drill bit refers to the diameter of the hole it creates, not the length of the bit. If you need to match an existing hole or a specific fastener, use a drill bit gauge (a metal card with labeled holes) for accurate identification. Digital calipers also work well for verifying bit diameter when the printed markings have worn off.
Choosing the Right Size
For wood screws, drill a pilot hole slightly smaller than the screw's core diameter (the solid shaft, ignoring the threads). For wall anchors, match the bit size to the anchor's listed drill size, which is always printed on the packaging. For bolts and machine screws, drill a hole that matches the bolt diameter or the anchor size specified by the manufacturer.
Speed and Pressure Tips
Drilling at the right speed is just as important as using the right bit. Get this wrong, and you will burn out bits, scorch wood, or crack tile.
General RPM Guidelines
- Softwood: High speed (1,500 to 3,000 RPM for bits under 3/8 inch). Wood is forgiving.
- Hardwood: Moderate speed (500 to 1,500 RPM). Reduce speed as bit diameter increases.
- Soft metals (aluminum, brass): Moderate speed (1,000 to 3,000 RPM for small bits). Use cutting fluid.
- Steel: Low speed (500 to 1,000 RPM for bits under 1/4 inch). Slower for harder alloys.
- Stainless steel: Very low speed (300 to 600 RPM). Cobalt bits and cutting oil are mandatory.
- Masonry: Moderate speed (500 to 1,000 RPM) with hammer action. Let the hammer do the work.
- Tile and glass: Very low speed (400 to 800 RPM). No hammer. Keep it wet.
The universal rule: as bit diameter increases, decrease speed. A 1-inch spade bit needs far fewer RPMs than a 1/8-inch twist bit.
When to Use Cutting Fluid
Always use cutting fluid or oil when drilling metal. It reduces heat, prevents the bit from work-hardening the material (a real problem with stainless steel), and extends bit life significantly. For tile and glass, use water as a coolant. For wood and plastic, lubrication is generally unnecessary.
Common Mistakes to Avoid
After I researched the most frequent problems people have with drill bits, these are the ones I see come up over and over again.
Using the wrong bit for the material. This is the biggest one. A wood bit in metal will dull instantly. A metal bit in masonry will shatter. A masonry bit on tile will crack it. Always match the bit to the material.
Drilling with dull bits. A dull bit generates more heat, requires more pressure, and produces rougher holes. If you find yourself pushing hard and getting nowhere, the bit is probably dull. Replace it or sharpen it. Continuing with a dull bit risks overheating your drill or snapping the bit.
Too much pressure. Let the bit do the cutting. Excessive pressure does not make the hole faster. It overheats the bit, causes wandering, and can break smaller bits. Apply steady, moderate pressure and let the flutes clear the debris.
Wrong speed for the material. Running too fast in metal overheats the bit. Running too slow in wood tears the fibers instead of cutting them. Refer to the RPM guidelines above and adjust based on the bit size.
Skipping the pilot hole. For screws in hardwood, large holes in any material, or any time precision matters, always drill a pilot hole first. A small pilot hole guides the larger bit and prevents splitting, wandering, and blowout on the exit side.
Not clearing chips. When drilling deep holes, periodically pull the bit out (known as peck drilling) to clear debris from the flutes. Packed flutes generate heat and can bind the bit in the hole, which is both frustrating and potentially dangerous.
Recommended Tools
What I like most about having the right cordless drill is that it makes every drilling task easier. If you are doing precision work or drilling repetitive holes, a drill press gives you unmatched accuracy and consistency. For driving fasteners after drilling pilot holes, an impact driver is the better tool for the job. And if you are still deciding which drill to buy, our cordless drill buying guide covers everything from voltage to chuck size.
Recommended Tools
Ready to buy? These are the top picks from our best cordless drill and best drill press guides.
DeWalt DCD791D2 20V MAX XR Brushless Drill/Driver (Best Overall)
DeWalt DCD791D2 20V MAX XR Brushless Drill/Driver (Best Overall)
The all-around performer for serious DIYers and contractors
Pros
- 620 in-lbs of torque handles demanding tasks without stalling
- Compact design at 7.52 inches front to back
- LED light with 20-second trigger release delay
- Two 2.0 Ah batteries and hard case included
Cons
- The 2.0 Ah batteries drain quickly on sustained heavy drilling
- Higher price point than comparable single-battery kits
- No hammer drill function for masonry
WEN 4214T 12-Inch Variable Speed Drill Press (Best Overall)
WEN 4214T 12-Inch Variable Speed Drill Press (Best Overall)
Woodworkers who want precise variable speed and a large chuck without spending $400+
Pros
- Infinitely variable speed from 580-3,200 RPM with digital readout
- 5/8" chuck handles large Forstner bits and hole saws
- Laser crosshair and LED work light for precision alignment
- Cast-iron build with minimal vibration at a competitive price
Cons
- 3-1/8" spindle travel limits deep-drilling in thick stock
- Table is only 9.5" square, so larger workpieces overhang
- At 59 lbs, it can shift during heavy drilling without being bolted down
Final Thoughts
Knowing how to choose the right drill bit is one of those foundational skills that pays off on every project. The decision tree is simple: identify your material, pick the matching bit type, choose the right material and coating for the job, select the correct size, and drill at the appropriate speed. That is it.
You do not need a massive collection to start. I recommend starting with a quality set of HSS twist bits, a few brad point bits for woodworking, a set of masonry bits, and a couple of spade bits. That combination will cover 90% of what you encounter around the house. Add cobalt bits and diamond-tipped tile bits as specific projects demand them.
If there is one thing I want you to take away from this guide, it is this: the single best investment you can make is not a more expensive bit. It is taking the extra ten seconds to grab the right one.
Affiliate Disclosure
This post contains affiliate links. As an Amazon Associate, HomeBuildLab earns from qualifying purchases at no additional cost to you. Learn more
Looking for the right tools and products?
Check out our product reviews and buying guides to find the best gear for your project.
Browse Reviews