How to Find a Stud Without a Stud Finder: 6 Simple Methods That Work
Quick Comparison
| Product | Best For | Buy |
|---|---|---|
 CH Hanson 03040 Magnetic Stud Finder (Best Budget) CH Hanson · None (rare earth magnets) · 0.24 lbs (3.8 oz) | Quick stud-finding for picture hanging and light-duty mounting | |
 Franklin Sensors ProSensor M210 (Best Overall) Franklin Sensors · Battery (2 AA, not included) · 7.2 oz (without batteries) | Anyone who wants the most accurate, easiest-to-use stud finder available |

CH Hanson 03040 Magnetic Stud Finder (Best Budget)
Quick stud-finding for picture hanging and light-duty mounting
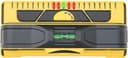
Franklin Sensors ProSensor M210 (Best Overall)
Anyone who wants the most accurate, easiest-to-use stud finder available
You need to hang a heavy shelf, mount a TV, or secure a curtain rod. You know you need a wall stud. But you don't have a stud finder, and the project is happening right now. Learning how to find a stud without a stud finder is easier than you think, and I'd argue it's a skill every homeowner should have.
Here's the good news: people found studs for decades before electronic stud finders existed. The methods below use nothing more than your knuckles, a magnet, a tape measure, or a flashlight. Most of them take less than five minutes. After looking at these techniques, I think the magnet method edges out the rest for pure reliability, but each approach has its strengths depending on your situation.
Before we get into the methods, a quick primer on what you're looking for. In standard residential construction, wall studs are vertical 2x4 (or 2x6) lumber framed behind the drywall. They're typically spaced 16 inches apart, measured from the center of one stud to the center of the next. This spacing is called "16 inches on center" and it's been the building standard in the U.S. for decades. Some older homes and certain wall sections use 24-inch spacing instead, but 16 inches is by far the most common.
Each stud is 1.5 inches wide (the actual dimension of a 2x4). That means you have a 1.5-inch target behind the drywall. Not huge, but definitely findable with the right approach.
Method 1: Knock on the Wall
This is the oldest trick in the book, and it still works. I think it's the first method most people try instinctively. The concept is simple: drywall over an empty cavity sounds hollow, while drywall backed by a solid wood stud sounds noticeably different. Denser. Duller. Less echo.
How to do it:
- Make a fist and rap your knuckles firmly against the wall. Start near where you want to mount something.
- Move about an inch to the left or right and knock again.
- Keep moving and knocking in a horizontal line across the wall.
- Listen for the change. When the hollow sound shifts to a solid, flat thud, you've likely found the edge of a stud.
- Continue past the solid spot. You should hear roughly 1.5 inches of solid sound before it goes hollow again on the other side.
Tips for accuracy: Use the pads of your knuckles, not your fingertips. Knock with consistent force each time so the sound differences are easier to detect. Quieter rooms make this easier. Turn off any music or TV so you can really hear the tonal shift.
This method works well for confirming a stud's general location, but it's not precise enough on its own for things like TV mounts where you need to hit the center of the stud. Combine it with one of the methods below for the best results.
Method 2: Use the Electrical Outlet Method
Here's something most people don't think about: electrical outlets and light switches are almost always mounted to the side of a stud. Building code requires them to be attached to framing. That makes every outlet on your wall a free clue. In my opinion, this is the most underrated method on the list because it gives you a guaranteed anchor point to measure from.
How to do it:
- Find the nearest outlet or light switch on the wall where you need a stud.
- Remove the outlet cover plate (no need to touch wiring, just the plastic plate).
- Look inside the box. You'll see which side of the outlet box is attached to the stud. The stud will be on the side where you can see (or feel) the wood framing.
- Now you know the exact location of one stud. From there, measure in 16-inch increments in either direction to find the neighboring studs.
Why this works so well: It gives you a confirmed, anchored starting point. Instead of guessing where the first stud might be, you know exactly where one is. Every measurement you take from that point will be more reliable.
A word of caution: Always turn off the breaker to that outlet before removing the cover plate and poking around inside the box. A non-contact voltage tester is cheap insurance and worth owning. If you have a cordless drill, chances are you already have screwdriver bits that make removing the cover plate a 10-second job.
Method 3: Measure from a Corner
This method relies on the standard 16-inch on-center framing rule. It's simple math, and it works in the vast majority of homes built after 1950.
How to do it:
- Go to the nearest corner of the wall.
- Hook your tape measure on the corner and measure out 16 inches. Mark it lightly with a pencil.
- Continue marking at 16-inch intervals: 32 inches, 48 inches, 64 inches, and so on.
- Each mark should land close to the center of a stud.
- Verify with the knock test (Method 1) at each mark.
Why it's not always perfect: Corners themselves contain studs, but the first stud away from the corner doesn't always fall at exactly 16 inches. It depends on how the framing crew started their layout. Doors and windows also interrupt the regular spacing pattern because they require extra framing (called jack studs and king studs) that throws off the 16-inch rhythm.
That's why the verification step matters. Use the measurements as a starting guide, then confirm with knocking or one of the other methods. If 16-inch spacing doesn't seem to line up, try measuring in 24-inch increments instead. Some builders, especially in non-load-bearing walls or older construction, use 24-inch on-center spacing.
Method 4: Use a Strong Magnet
What I find most important when trying to locate studs is consistency, and that's exactly what the magnet method delivers. This is arguably the most reliable low-tech method on this list. It doesn't find the stud directly. Instead, it finds the drywall screws or nails that are driven into the stud, which tells you exactly where the stud is.
What you need: A strong rare-earth magnet (neodymium magnet). These are small, inexpensive, and incredibly powerful for their size. You can find them at any hardware store or online for a few dollars. A standard refrigerator magnet is usually too weak. You need something with real pull strength.
How to do it:
- Place the magnet flat against the wall in the general area where you want to find a stud.
- Slowly slide it across the wall in a sweeping pattern. Move horizontally first, then vertically.
- When the magnet passes over a screw or nail head, you'll feel it grab and stick to the wall. The pull is unmistakable.
- Mark that spot with a pencil.
- Move the magnet straight up or down from that point. If you find another screw 12 to 16 inches away in a vertical line, you've confirmed the stud's path from floor to ceiling.
Pro tip: I'd suggest tying the magnet to a short piece of string (about 8 inches long) and dangling it against the wall. As you move it slowly across the surface, the magnet will visibly swing toward any hidden fastener. This pendulum technique makes the pull easier to see, especially on textured walls where sliding friction can mask the magnet's reaction.
Some people keep a small magnet in their toolbox permanently. It's that useful. And unlike an electronic stud finder, a magnet never needs batteries or calibration.
Method 5: The Flashlight Trick
This method works best in rooms where the drywall finish isn't perfectly smooth. It reveals the tiny dimples where screws sit just below the drywall surface.
How to do it:
- Turn off the room lights or wait until evening.
- Hold a bright flashlight (your phone's flashlight works in a pinch) almost flat against the wall. The beam should hit the wall at a very shallow angle, almost parallel to the surface.
- Slowly sweep the light across the wall section you're interested in.
- Look for small circular dimples or slight imperfections in the surface. These are drywall screw heads that were driven slightly below the surface and then covered with joint compound.
- When you find a dimple, look for more dimples in a vertical line above and below it. A vertical row of dimples marks a stud.
When this works best: Walls with a flat or light-orange-peel texture. Walls that have been painted many times may hide the dimples completely. Freshly finished drywall, on the other hand, shows dimples more clearly because fewer coats of paint have filled them in.
When it doesn't work: Heavily textured walls (knockdown, popcorn, or heavy orange peel) create so many surface irregularities that screw dimples blend in. In those cases, the magnet method (Method 4) is a much better choice.
Method 6: Use a Wire Coat Hanger
This is the most invasive method on the list, and you should only use it when you're going to be drilling into the wall anyway. The idea is simple: poke a thin wire through the drywall and sweep it behind the wall until it hits a stud.
How to do it:
- Straighten out a wire coat hanger, leaving a small 90-degree bend (about 3 inches long) at one end.
- Drill a small hole in the drywall in the area where you suspect a stud might be. Use a drill bit just large enough for the wire to pass through (1/8 inch works well).
- Insert the bent end of the wire into the hole.
- Rotate the wire inside the wall like a clock hand, sweeping it left and right.
- When the wire hits something solid, you've found a stud. Note the direction and approximate distance.
- Drill a second small test hole at the suspected stud location to confirm.
Why this is a last resort: You're putting holes in your wall. Small holes, yes, but holes nonetheless. If you're planning to hang a heavy item and will be drilling pilot holes anyway, the extra hole from this method is no big deal. But if you're trying to keep the wall pristine, stick with the non-invasive methods first.
The coat hanger method does have one major advantage: it gives you 100% confirmation. There's no guessing. When the wire hits wood, you know it's a stud.
Best Way to Find a Stud Without a Stud Finder
If you want a single recommendation, the magnet method (Method 4) is the most consistently reliable. From what I have seen about how each of these techniques performs across different wall types, the magnet wins on precision and simplicity. It gives you a precise location by finding the actual fasteners in the stud, it works on any wall texture, and it requires zero skill or interpretation. You feel the pull or you don't.
Here's how the methods stack up:
Method: Knock test | Reliability: Medium | Precision: Low | Ease: Easy | Invasive?: No
Method: Electrical outlet | Reliability: High | Precision: High | Ease: Easy | Invasive?: No
Method: Measure from corner | Reliability: Medium | Precision: Medium | Ease: Easy | Invasive?: No
Method: Magnet | Reliability: High | Precision: High | Ease: Easy | Invasive?: No
Method: Flashlight | Reliability: Medium | Precision: Medium | Ease: Easy | Invasive?: No
Method: Wire hanger | Reliability: Very high | Precision: Very high | Ease: Moderate | Invasive?: Yes
For the best results, combine two or three methods. I'd suggest starting with the electrical outlet method to establish a known stud location. Then use the measuring method to predict where the next studs should be. Finally, confirm each predicted location with the magnet or knock test. This layered approach takes maybe 10 minutes and gives you high confidence before you drive a single screw.
When to Just Buy a Stud Finder
The methods above work great in a pinch. But if you're doing regular home improvement projects (hanging shelves, mounting TVs, installing grab bars, running cables), I think a dedicated stud finder pays for itself quickly in time saved and holes avoided.
Modern electronic stud finders can detect the edges of studs, locate the center, and even identify wiring and pipes behind the wall. Basic models start around $20 and do the job well for most homeowners. If you're curious about what's available, check out our best stud finders roundup for top picks at every price point.
You should also consider a stud finder if you're working with:
- Plaster and lath walls. The knock test and flashlight trick are nearly useless on plaster because the wall material is uniformly dense. Magnets still work (plaster was typically nailed to lath with steel nails), but an electronic finder is faster.
- Walls with thick texture. Heavy knockdown or skip-trowel textures hide dimples and make the flashlight method ineffective.
- Multiple mounting points. If you're hanging a French cleat, a long shelf rail, or a full TV mount that needs four or more anchor points, the efficiency of a stud finder matters.
For learning more about how electronic models work and how to get the most accurate readings, see our guide on how to use a stud finder.
Common Mistakes to Avoid
Assuming all studs are 16 inches apart. Most are, but not all. Windows, doors, and corners disrupt the pattern. Always verify before drilling.
Confusing pipes or conduit for studs. A magnet will stick to metal pipes and electrical conduit too, not just drywall screws. If your magnet sticks in an unusual spot that doesn't align with a 16-inch pattern, you might be over a pipe. Proceed carefully.
Trusting a single method without verification. The knock test alone can fool you, especially on walls with thick insulation or uneven drywall. Always confirm with a second method.
Drilling without a pilot hole. Even after you've located the stud, drill a small pilot hole first. If the bit sinks into wood after passing through the drywall, you've confirmed the stud. If it passes through drywall and hits air, you missed. A tiny test hole is much easier to patch than a large anchor hole in the wrong spot.
Forgetting about stud edges. A stud is only 1.5 inches wide. Finding the stud is step one. Hitting the center of the stud (for maximum holding strength) is step two. Once you've located one edge, measure 3/4 inch toward the center before placing your anchor or screw.
Recommended Tools
Ready to buy? These are the top picks from our best stud finder guide.
CH Hanson 03040 Magnetic Stud Finder (Best Budget)
CH Hanson 03040 Magnetic Stud Finder (Best Budget)
Quick stud-finding for picture hanging and light-duty mounting
Pros
- No batteries, no calibration, no electronics to malfunction
- Strong rare earth magnets stick to the wall hands-free for easy marking
- Built-in bubble level for alignment
- Compact enough to fit in a pocket
Cons
- Cannot detect studs directly, only the metal fasteners in them
- No AC wire detection (will not warn about electrical hazards)
- Struggles with deeper walls or walls with few fasteners
Franklin Sensors ProSensor M210 (Best Overall)
Franklin Sensors ProSensor M210 (Best Overall)
Anyone who wants the most accurate, easiest-to-use stud finder available
Pros
- 13 sensors show the full width of studs instantly, no calibration needed
- Live wire detection meter adds a genuine safety feature
- Built-in bubble level and center indicator for precise marking
- Made in the USA with consistent build quality
Cons
- No metal-specific scanning mode (detects metal studs, but can't distinguish metal from wood)
- Batteries not included
- Costs roughly double the price of basic electronic stud finders
Final Thoughts
Knowing how to find a stud without a stud finder is one of those skills that sounds basic but saves you real frustration on project day. In my opinion, the magnet method is the most foolproof approach for most walls. The electrical outlet method gives you a confirmed starting point. And the 16-inch measuring trick fills in the rest of the map.
For a quick weekend project, these six methods will get the job done with tools you already have around the house. For ongoing home improvement work, investing in a proper stud finder is well worth the $20 to $50. Either way, the core principle is the same: locate the stud, verify before you drill, and always aim for the center.
Now get that TV mounted.
Affiliate Disclosure
This post contains affiliate links. As an Amazon Associate, HomeBuildLab earns from qualifying purchases at no additional cost to you. Learn more
Looking for the right tools and products?
Check out our product reviews and buying guides to find the best gear for your project.
Browse Reviews