How to Solder: A Beginner's Guide to Strong, Clean Joints
Quick Comparison
| Product | Best For | Buy |
|---|---|---|
 Hakko FX-888D (Best Overall) Hakko · Corded (120V) · 2.6 lbs | Hobbyists and professionals who want a reliable daily-driver station | |
 X-Tronic 3020-XTS (Best Value) X-Tronic · Corded (120V) · 1.5 lbs | Anyone who wants station-grade performance without the premium price |
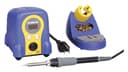
Hakko FX-888D (Best Overall)
Hobbyists and professionals who want a reliable daily-driver station
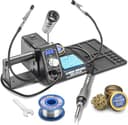
X-Tronic 3020-XTS (Best Value)
Anyone who wants station-grade performance without the premium price
Soldering looks intimidating until you actually try it. The truth is, learning how to solder is one of the most accessible skills you can pick up, and it opens the door to everything from electronics repair to custom LED projects and guitar pedal builds. I remember being nervous about my first solder joint, but within an hour I was making clean connections and wondering why I waited so long.
Here is what most tutorials get wrong: they overcomplicate the process. I believe soldering is fundamentally simple. You heat two metal surfaces, introduce a filler metal (solder) that melts and flows between them, and let it cool into a permanent electrical and mechanical bond. That is it. The technique matters, but the concept is straightforward.
This guide walks you through everything you need to get started. You will learn which tools to buy, which solder to use, how to set up your workspace safely, and how to make clean solder joints on your very first attempt. By the end, you will also know how to spot bad joints and fix them, so mistakes become learning opportunities instead of frustrations.
Tools You Will Need
Before you heat anything up, gather these essentials. You can get everything on this list for well under $100.
Soldering Iron or Station
A basic soldering iron (pencil style) works fine for beginners, but I'd pick a soldering station with adjustable temperature control over a plain pencil iron every time. Stations let you dial in the exact temperature for different jobs, which makes a real difference in joint quality. Look for something in the 40 to 60 watt range. Lower wattage irons struggle to heat larger joints, while higher wattage gives you more headroom without necessarily running hotter. Need a recommendation? Check out my best soldering irons roundup.
Solder
You will want rosin-core solder for electronics work (more on solder types below). Start with 0.8mm (0.031 inch) diameter, which is versatile enough for most through-hole and general purpose work.
Flux
Rosin-core solder has flux built into the center of the wire, but having a separate flux pen or jar of rosin paste on hand helps when you are working with oxidized surfaces or joints that are not cooperating. Flux cleans the metal surfaces and helps solder flow smoothly.
Helping Hands (Third Hand Tool)
This is a small stand with adjustable alligator clips that hold your workpiece steady while you solder. Trying to hold a circuit board, a soldering iron, and solder wire simultaneously with two hands is a recipe for burns and bad joints. In my opinion, a helping hands tool is the most underrated soldering accessory out there, and it solves that problem for about $10.
Tip Cleaner
A brass wire sponge (brass wool) or a damp cellulose sponge is essential for keeping your soldering iron tip clean between joints. A dirty, oxidized tip transfers heat poorly and makes soldering frustrating. Personally, I prefer brass wool because it cleans without dropping the tip temperature.
Safety Glasses and Ventilation
Molten solder can occasionally spit, so basic safety glasses protect your eyes. More importantly, solder flux produces fumes when heated that are irritating to your eyes and lungs. Work near an open window, use a small desk fan to push fumes away from your face, or invest in a fume extractor with a carbon filter.
Other Helpful Items
- Wire cutters/flush cutters: For trimming component leads after soldering.
- Desoldering pump (solder sucker): For removing solder when you make mistakes.
- Desoldering wick (solder braid): An alternative to the pump for cleaning up joints.
- Heat-resistant mat: Protects your work surface from burns and solder drips.
Understanding Solder Types
Not all solder is the same. Choosing the right type saves you headaches and produces better joints.
Leaded vs. Lead-Free
Leaded solder (typically 60/40 or 63/37 tin-to-lead ratio) is easier to work with. It melts at a lower temperature (around 183 to 190 degrees Celsius), flows more smoothly, and produces shinier joints that are easier to visually inspect. The 63/37 alloy is slightly preferred because it is a "eutectic" alloy, meaning it transitions directly from solid to liquid with no pasty stage. This gives you cleaner, more consistent joints.
Lead-free solder (usually SAC305, a tin-silver-copper alloy) melts at a higher temperature (around 217 to 227 degrees Celsius) and is slightly harder to work with. It does not flow quite as readily, and the joints tend to look duller even when properly made. However, it is the standard in commercial manufacturing due to environmental regulations (RoHS compliance).
My recommendation: If you are a beginner learning at home, start with 63/37 leaded solder. It is more forgiving and lets you focus on technique. Just wash your hands after handling it and work in a ventilated space. Once your technique is solid, switching to lead-free is straightforward.
Rosin Core vs. Acid Core
Rosin-core solder has a mild rosin flux in the center of the wire. This is the correct choice for electronics. The rosin flux is non-corrosive and leaves minimal residue.
Acid-core solder contains an aggressive acid-based flux designed for plumbing and sheet metal work. Never use acid-core solder on electronics. The acid will corrode your circuit board traces and component leads over time, causing failures that are difficult to diagnose.
Diameter
For general electronics work, 0.8mm (0.031 inch) diameter is the sweet spot. It gives you enough control for small components without being so thin that you constantly run out. If you plan to do a lot of surface-mount work, grab a spool of 0.5mm as well. For larger wire-to-wire connections or bigger joints, 1.0mm or 1.2mm solder speeds things up.
Setting Up Your Workspace
A good workspace prevents accidents and makes the whole process more enjoyable.
Ventilation First
Position a small fan behind your work area to blow fumes away from you, or set up a fume extractor directly at your workstation. Even with rosin-core solder, the flux fumes can irritate your respiratory system over time. Never solder in an enclosed room with no air movement.
Fire Safety
Keep your soldering iron in a proper stand when not in use. Never set a hot iron down on your workbench. Clear the area of flammable materials like paper towels, cardboard, and solvents. A heat-resistant silicone mat underneath your work area is a worthwhile investment.
Temperature Settings
If you are using a temperature-controlled station, start with these guidelines:
- Leaded solder (60/40 or 63/37): Set your iron to 315 to 345 degrees Celsius (600 to 650 degrees Fahrenheit).
- Lead-free solder: Set your iron to 345 to 380 degrees Celsius (650 to 715 degrees Fahrenheit).
These temperatures are higher than the solder's melting point on purpose. The extra heat compensates for heat loss when the tip contacts the joint. If your joints are taking longer than 2 to 3 seconds, bump the temperature up by 10 degrees. If components are browning or pads are lifting, turn it down.
Tin Your Tip Before You Start
Before your first joint of the session, melt a small amount of solder onto the tip of the iron. This is called "tinning." A properly tinned tip looks shiny and silver. It transfers heat far more effectively than a bare or oxidized tip. Re-tin your tip periodically throughout your work session and always tin it before putting the iron away. This protects the tip from oxidation during storage.
Step-by-Step: How to Solder a Through-Hole Joint
This is the most common type of soldering for beginners. You are connecting a component lead (wire) that passes through a hole in a circuit board.
Step 1: Prepare the Components
Insert the component lead through the hole in the circuit board. Bend the lead slightly on the underside (about 30 to 45 degrees) to hold the component in place. If you are using a helping hands tool, clip the board so the underside faces up and you can access the solder pads easily.
Step 2: Clean and Tin Your Tip
Wipe the soldering iron tip on your brass wool or damp sponge to remove any old solder or oxidation. Then apply a small bead of fresh solder to the tip. The tip should look bright and shiny.
Step 3: Heat the Joint (Not the Solder)
This is the most important step, and the one beginners most often get wrong. Place the flat side of your soldering iron tip so it touches both the component lead and the copper pad simultaneously. Hold it there for 1 to 2 seconds to heat both surfaces. The goal is to bring the pad and the lead up to temperature so the solder flows onto them, not just onto the iron.
Step 4: Apply Solder to the Joint
While keeping the iron in contact with the joint, touch the solder wire to the opposite side of the joint from where the iron tip sits. The solder should melt and flow around the joint, pulled by the heat of the pad and lead. Feed in just enough solder to form a small, concave fillet around the lead. This usually takes about 1 to 2 seconds.
Step 5: Remove the Iron
Pull the soldering iron away smoothly once you see the solder has flowed around the entire joint. Do not jerk or wiggle the iron, just lift it straight away. Let the joint cool naturally. Do not blow on it. Moving or disturbing the joint while the solder is cooling creates cold joints.
Step 6: Inspect the Joint
A good joint should look like a small, shiny volcano or cone shape around the component lead. The solder should have a smooth, slightly concave surface and a bright, reflective appearance (with leaded solder). You should be able to see the outline of the lead through the solder.
Step 7: Trim the Lead
Use flush cutters to trim the excess component lead just above the solder joint. Cut at an angle for a clean finish. Hold the lead with your other hand or a pair of pliers while cutting so it does not fly across the room.
What a Good Solder Joint Looks Like
Recognizing good and bad joints is the fastest way to improve your soldering.
Good Joints
- Shiny and smooth surface (with leaded solder; lead-free joints may look slightly more matte, which is normal).
- Concave shape, like a small volcano. The solder slopes from the pad up to the lead.
- Smooth transition between the solder, the pad, and the lead. No gaps or visible boundaries.
- Just enough solder. The pad should be covered, but you should still see the shape of the lead.
Cold Joints (Bad)
Cold joints happen when the surfaces were not hot enough for the solder to flow properly. They look:
- Dull and grainy, with a rough or frosty texture.
- Blobby or lumpy, like the solder just sat on top instead of flowing around the joint.
- Cracked or fractured, sometimes with visible lines in the solder.
Cold joints create unreliable electrical connections that may work intermittently or fail under vibration. If you spot one, reheat the joint with your iron, add a tiny bit of fresh solder (the flux will help it reflow), and let it cool undisturbed.
Too Much Solder
If the joint looks like a ball sitting on top of the pad, you used too much. The solder should form a concave shape, not a convex blob. Too much solder can bridge adjacent pads and cause short circuits.
Too Little Solder
If you can see exposed copper on the pad or the joint looks thin and skeletal, add more solder. An inadequate joint will have high resistance and may crack under stress.
How to Desolder (Fix Mistakes)
Mistakes are inevitable when you are learning. The good news is that every solder joint can be undone.
Using a Desoldering Pump (Solder Sucker)
A desoldering pump is a spring-loaded vacuum tool that sucks up molten solder.
- Press down the plunger to prime the pump.
- Heat the solder joint with your iron until the solder melts completely.
- While the solder is still molten, position the pump tip right next to the joint and press the release button.
- The pump creates a burst of suction that pulls the molten solder away.
- Repeat if necessary. Sometimes it takes two or three passes to clear a joint completely.
Using Solder Wick (Desoldering Braid)
Solder wick is a flat braid of fine copper wire coated with flux. It removes solder through capillary action.
- Place the end of the solder wick on top of the joint you want to desolder.
- Press your soldering iron tip onto the wick, directly over the joint.
- The heat transfers through the wick to the solder below. As the solder melts, the wick absorbs it like a sponge.
- Once the wick is saturated, remove both the iron and the wick together while the solder is still molten.
- Cut off the used section of wick and repeat if needed.
Which method is better? I recommend having both. Solder wick provides more precision and cleaner results, making it ideal for working near sensitive components. The desoldering pump is faster and more practical for removing large amounts of solder. What I like most about solder wick is the control it gives you, but the pump is indispensable for clearing through-holes quickly.
Common Beginner Mistakes
I think these are the biggest stumbling blocks for newcomers. Avoid these pitfalls and you will progress much faster.
Moving Too Fast
The most common mistake is not heating the joint long enough. If you touch the solder to the iron and drip it onto a cold pad, you will get a cold joint every time. Give the pad and lead 1 to 2 seconds of heat before introducing solder.
Using Too Much Solder
Beginners tend to keep feeding solder long after the joint is complete. A through-hole joint on a standard circuit board needs only a second or two of solder feed. Stop as soon as you see a concave fillet form around the lead.
Skipping Flux
If your rosin-core solder is not producing clean joints, the flux in the core may not be enough for the job. Apply additional flux to the joint before soldering, especially when working with older or oxidized components. Flux makes a dramatic difference in how easily solder flows.
Overheating Components
Holding your iron on a joint for too long (more than 5 seconds) can damage sensitive components like LEDs, transistors, and ICs. If a joint is not working after a few seconds, remove the iron, let everything cool, apply flux, and try again. A heat gun can be useful for heat shrink tubing, but never use one to try to reflow solder joints on a circuit board.
Forgetting to Clean the Tip
A dirty, oxidized tip is the number one cause of frustration for beginners. If your solder is balling up on the tip instead of flowing smoothly, wipe the tip and re-tin it. Get in the habit of cleaning the tip before every joint.
Not Securing the Workpiece
Trying to solder while the board wobbles around leads to burned fingers and bad joints. Always use a helping hands tool, a PCB holder, or even a piece of poster tack to hold things steady. Stability is more important than most people realize.
Recommended Tools for Getting Started
You do not need to spend a fortune. I recommend starting with a quality soldering iron with adjustable temperature, a spool of 63/37 rosin-core solder, a brass tip cleaner, and a helping hands tool. That combination will cover 90% of beginner projects. As you advance, a rotary tool can be helpful for trimming, deburring, and precision work on enclosures and housings.
For heat shrink tubing and certain rework tasks, a dedicated heat gun is much safer and more controlled than holding a lighter or using your soldering iron (which will ruin the tip). Check out my full list of heat gun uses to see what else it can do around the shop.
Recommended Tools
Ready to buy? These are the top picks from our best soldering iron guide.
Hakko FX-888D (Best Overall)
Hakko FX-888D (Best Overall)
Hobbyists and professionals who want a reliable daily-driver station
Pros
- PID temperature control holds within a few degrees of the set point
- Over 30 T18 tip shapes available for any soldering task
- 5 preset temperatures for quick switching between tasks
- Compact footprint doesn't hog bench space
Cons
- Two-button interface takes time to learn
- The blue-and-yellow color scheme isn't for everyone
- No digital temperature readout on the handpiece itself
X-Tronic 3020-XTS (Best Value)
X-Tronic 3020-XTS (Best Value)
Anyone who wants station-grade performance without the premium price
Pros
- PID temperature control with 3.6F stability at a budget price
- Auto-sleep timer protects your tips and saves energy
- Brass sponge tip cleaner and solder roll holder built in
- Five extra tips included in the box
Cons
- Tip ecosystem is smaller than Hakko or Weller
- 60W of actual heating power may struggle with large ground planes
- Base unit feels less robust than premium stations
Final Thoughts
Learning how to solder is one of those skills that pays for itself almost immediately. Once you can make clean, reliable joints, you can repair headphones, build custom electronics, swap components on circuit boards, and tackle projects that would otherwise require hiring someone or throwing things away.
Start with a cheap practice kit or an old piece of electronics you do not mind destroying. Focus on the fundamentals: a clean, tinned tip, proper heat transfer to the joint, and patience. Within an hour of practice, you will be making joints that are clean, shiny, and strong.
The most important thing to remember is to heat the joint, not the solder. Everything else follows from that one principle. Get that right, and you are well on your way. Personally, I think soldering is one of the most rewarding DIY skills because the feedback is immediate: you can see and test your work right away.
Affiliate Disclosure
This post contains affiliate links. As an Amazon Associate, HomeBuildLab earns from qualifying purchases at no additional cost to you. Learn more
Looking for the right tools and products?
Check out our product reviews and buying guides to find the best gear for your project.
Browse Reviews