How to Use an Angle Grinder Safely: A Practical Guide for Beginners
Quick Comparison
| Product | Best For | Buy |
|---|---|---|
 DeWalt DCG413B 20V MAX XR (Best Overall) DeWalt · Cordless · 3.7 lbs (tool only) | Anyone who wants a premium cordless grinder with top-tier safety features | |
 Makita 9557PBX1 (Best Value) Makita · Corded · 4.5 lbs | Budget-conscious buyers who want a complete kit ready to work out of the box |
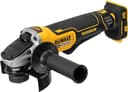
DeWalt DCG413B 20V MAX XR (Best Overall)
Anyone who wants a premium cordless grinder with top-tier safety features
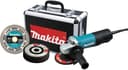
Makita 9557PBX1 (Best Value)
Budget-conscious buyers who want a complete kit ready to work out of the box
An angle grinder is one of the most versatile power tools you can own. It cuts metal, grinds welds, strips rust, and preps surfaces faster than almost anything else in your shop. But knowing how to use an angle grinder safely is not optional. I think this is the single most important point in this entire guide. This is a tool that spins an abrasive disc at up to 12,000 RPM inches from your hands. Respect it, and it will save you hours of work. Get careless, and you are looking at a trip to the emergency room.
Here is the truth most tool guides skip: the majority of angle grinder injuries are not freak accidents. They are predictable results of skipping basic safety steps. Removing the guard "just for a second," using the wrong disc, operating with one hand. From injury reports, these are the mistakes that fill hospital waiting rooms. The good news is that every one of them is preventable.
I'll admit, the angle grinder was the one tool in my shop that genuinely made me nervous when I started out. But once you build the right habits, it becomes one of the most useful tools you own. This guide walks you through what you need to know before you power up your grinder for the first time: the right protective gear, disc selection, basic cutting and grinding techniques, and the safety rules that matter most.
Essential Safety Gear for Using an Angle Grinder
An angle grinder throws sparks, metal fragments, and abrasive dust in every direction. You need real protection, not just safety glasses perched on your forehead.
Face and Eye Protection
At minimum, wear ANSI-rated safety glasses with side shields. For heavy grinding or cutting, I'd suggest upgrading to a full face shield worn over your safety glasses. A shattered disc sends fragments at bullet-like speeds, and a face shield is the barrier between that debris and your eyes.
Gloves
Wear heavy leather work gloves. They protect against sparks, hot metal, and vibration. Avoid loose-fitting fabric gloves that could snag on the spinning disc.
Hearing Protection
Angle grinders produce between 95 and 110 decibels depending on the task. That is loud enough to cause permanent hearing damage in minutes. Foam earplugs or over-ear muffs are non-negotiable.
Clothing
Wear a long-sleeve cotton or leather work shirt. Synthetic fabrics can melt into your skin when hit by sparks. A leather apron is even better for extended grinding sessions. Tuck in loose clothing, remove jewelry, and tie back long hair. Anything loose near a spinning disc becomes a catch hazard.
Respiratory Protection
Grinding and cutting metal produces fine particulate dust. A P100-rated dust mask or half-face respirator is essential, especially when working with stainless steel, galvanized metal, or anything coated in paint.
Know Your Discs
Choosing the right disc is half the battle. In my opinion, disc selection is where most beginners go wrong. Each type is designed for a specific job, and using the wrong one is one of the fastest ways to get hurt.
Cutting Discs (Cut-Off Wheels)
These are thin (typically 1mm to 1.6mm) and designed to slice through metal, rebar, bolts, and pipe. They work by plunging straight into the material. Never apply side pressure to a cutting disc. They are not built for lateral force and can shatter.
Grinding Wheels
Thicker and more rigid than cutting discs, grinding wheels are used at an angle (15 to 30 degrees) against the workpiece. They remove material quickly and are ideal for smoothing welds, deburring edges, and shaping metal. Lower grit numbers cut faster but leave a rougher finish.
Flap Discs
Think of a flap disc as a hybrid between a grinding wheel and a sander. Overlapping "flaps" of abrasive material remove stock while blending the surface simultaneously. These are excellent for weld cleanup, beveling edges, and surface prep before painting. If I had to recommend one disc type for someone just starting out, it would be a flap disc. They are more forgiving than grinding wheels and a great choice for beginners.
Wire Wheels and Wire Cups
Wire attachments are designed for cleaning, not cutting. Use them to strip rust, remove old paint, and clean weld spatter. Wire wheels work on flat surfaces, while wire cups are better for corners and recessed areas. Always check the RPM rating, because wire wheels tend to have lower maximum speeds than abrasive discs.
Paint Stripping Discs
Made from a non-woven nylon material, these are gentler than wire wheels. They strip paint and coatings without gouging softer metals like aluminum. If you are working on a restoration project or prepping a surface for refinishing, these are your best bet.
Setting Up Your Angle Grinder
Before you plug in or charge up, take five minutes to set up your grinder properly. What I find most important is building a pre-use routine. Skipping this step is how most accidents start.
Check the Guard
The guard is the metal or plastic shield that covers roughly half the disc. It must be in place every single time you use the grinder. Adjust it so the open side faces away from your body and directs sparks and debris toward the floor or away from you. Most guards are adjustable with a lever or screw clamp. For cutting, position the guard so it blocks the majority of sparks from your face and torso. For grinding at an angle, rotate the guard to cover the upper portion of the disc.
Attach the Side Handle
Every angle grinder ships with a side handle for a reason: two-handed operation is essential for control. Thread the handle into the left or right side of the gear head (whichever is more comfortable for your stance), and use it every time. One-handed operation dramatically increases the chance of losing control during kickback.
Install the Disc Correctly
- Unplug the grinder (or remove the battery).
- Press the spindle lock button and hold it.
- Use the spanner wrench to remove the flange nut.
- Place the disc onto the spindle, making sure the center hole sits flat on the mounting flange.
- Thread the flange nut back on and tighten with the wrench.
- Release the spindle lock and give the disc a gentle spin by hand to check for wobble.
If the disc wobbles, remove it and re-seat it. A wobbling disc at 11,000 RPM is a disaster waiting to happen.
Match the RPM
Every disc has a maximum RPM rating printed on the label. Your grinder's no-load speed (found in the manual or on the nameplate) must be at or below the disc's rated RPM. A 4.5-inch grinder typically runs between 8,000 and 12,000 RPM. A 7-inch grinder runs between 6,000 and 8,000 RPM. Never put a 7-inch disc on a 4.5-inch grinder, as the larger disc will exceed its safe speed and can explode.
Basic Techniques
With your gear on and your grinder set up, here are the core operations you will use most often.
Cutting Metal
Use a thin cutting disc (not a grinding wheel). Mark your cut line, clamp the workpiece securely, and let the disc do the work. I think the biggest beginner mistake here is applying too much force. Do not push hard. Guide the grinder straight down into the material with steady, moderate pressure. Keep the disc perpendicular to the surface. If you angle it, you risk binding and kickback. Let the disc move through the metal at its own pace.
For longer cuts in sheet metal or plate, score a shallow line first, then deepen it with repeated passes. This gives you more control and reduces heat buildup.
Grinding Welds
Switch to a grinding wheel or flap disc. Hold the grinder at a 15 to 30 degree angle to the surface and move it back and forth across the weld. Flap discs are more forgiving here because they blend the weld into the base metal without gouging. If you are comparing tools for detailed metalwork, an oscillating tool handles tight spaces better, but for open weld seams, the angle grinder is unmatched.
Surface Preparation
Before painting or refinishing metal, you need a clean, slightly roughened surface. A flap disc (80 or 120 grit) works well for this. Move the grinder in smooth, overlapping passes. Do not stay in one spot too long, or you will create low spots in the metal. For similar surface prep on wood projects, an orbital sander is the right tool instead.
Rust Removal
A wire wheel or paint stripping disc removes rust quickly. Use light pressure and let the wire tips do the scrubbing. Pressing too hard bends the wires and reduces effectiveness. Wire wheels also work for cleaning old paint, scale, and corrosion from wrought iron, fences, and automotive parts.
Safety Rules That Save Fingers (and Worse)
These are not suggestions. From injury data, I can tell you these rules exist for a reason. Treat them as rules you never break.
Never remove the guard. The guard exists to deflect disc fragments if a wheel shatters. A broken disc at full speed becomes shrapnel. OSHA standards require guards on all portable grinders for good reason.
Clamp your workpiece. A shifting piece of metal during a cut is one of the most common causes of kickback. Use a bench vise, C-clamps, or bar clamps to lock the material in place. Never hold the workpiece with one hand and the grinder with the other.
Inspect discs before every use. Tap the disc lightly with a non-metal object and listen. A solid disc rings clearly. A cracked disc produces a dull thud. Also look for visible chips, gouges, or wear. Replace any disc that shows damage.
Stay out of the kickback zone. If the disc binds, the grinder can kick violently in the opposite direction of disc rotation. Position your body so that if kickback occurs, the tool moves away from you, not into your torso or face.
Disconnect power before changing discs. Every time. No exceptions. The spindle lock is not a substitute for removing the battery or unplugging the tool.
Clear the area. Sparks travel 10 feet or more. Keep flammable materials (sawdust, solvents, rags, gas cans) well out of range. If you are working in a garage, sweep the floor first.
Let the disc reach full speed. Before touching the disc to the workpiece, let the grinder spin up to full operating speed. Applying load during startup stresses the disc and motor.
Common Mistakes to Avoid
From injury data and best practices, these are the errors that cause the most problems.
Using a cutting disc for grinding. Cutting discs are thin and designed for straight plunge cuts. They cannot handle side pressure. Applying lateral force to a cutting disc causes it to flex and shatter. If you need to grind, switch to a grinding wheel or flap disc.
Removing the guard for "better access." This is the single most common shortcut that leads to serious injury. If the guard is blocking your work angle, reposition it. Modern guards are adjustable for exactly this reason.
Mismatched RPM. Installing a disc rated for 6,000 RPM on a grinder spinning at 11,000 RPM can cause the disc to disintegrate mid-use. Always check the rating before mounting.
Too much pressure. Let the tool do the work. Pressing hard does not make the cut faster. It overheats the disc, wears it prematurely, increases the chance of binding, and accelerates motor wear. A steady, moderate touch is faster and safer.
One-handed operation. You might see it in YouTube videos. Do not copy it. Two hands on the tool (one on the rear grip, one on the side handle) gives you the control and leverage to manage kickback. Without the side handle, a kickback event can rip the grinder right out of your hand.
Working without ventilation. Metal dust, especially from stainless steel or galvanized coatings, is hazardous to your lungs. Work outdoors or in a well-ventilated area with a respirator.
Recommended Gear
If you are shopping for your first angle grinder, check out our best angle grinders roundup, which covers models for every budget and use case. For finer detail work and tight spots where a grinder is too aggressive, an oscillating tool is a better fit.
Recommended Tools
Ready to buy? These are the top picks from our best angle grinder guide.
DeWalt DCG413B 20V MAX XR (Best Overall)
DeWalt DCG413B 20V MAX XR (Best Overall)
Anyone who wants a premium cordless grinder with top-tier safety features
Pros
- Kickback brake stops the wheel in under 2 seconds
- Two-stage trigger prevents accidental activation
- Brushless motor runs cool and extends battery life
- Lightweight at 3.7 lbs (bare tool)
Cons
- Battery and charger sold separately (tool only)
- 9,000 RPM is lower than most corded grinders
- Premium price for a bare tool
Makita 9557PBX1 (Best Value)
Makita 9557PBX1 (Best Value)
Budget-conscious buyers who want a complete kit ready to work out of the box
Pros
- Outstanding bundle value with case, diamond blade, and five grinding wheels
- Lightweight at 4.5 lbs for comfortable extended use
- Paddle switch with both lock-on and lock-off options
- 11,000 RPM matches more expensive grinders
Cons
- 7.5-amp motor struggles with heavy, sustained grinding
- No brushless motor at this price point
- No kickback brake
Final Thoughts
Learning how to use an angle grinder safely comes down to three things: the right protective gear, the correct disc for the job, and a healthy respect for what 11,000 RPM can do to metal (and to you). None of the steps in this guide are difficult. They just require you to slow down for a few minutes before you start cutting or grinding.
Build these habits now, and they will become automatic. Skip them, and the consequences are severe. I'd suggest starting with simple tasks (like rust removal with a flap disc) before moving on to precision cutting. Personally, I think an angle grinder deserves a spot in every workshop, but only if you use it the way it is designed to be used: with the guard on, two hands on the tool, and the right disc spinning at the right speed.
Stay safe, and grind on.
Affiliate Disclosure
This post contains affiliate links. As an Amazon Associate, HomeBuildLab earns from qualifying purchases at no additional cost to you. Learn more
Looking for the right tools and products?
Check out our product reviews and buying guides to find the best gear for your project.
Browse Reviews