How to Replace a Kitchen Faucet: A Step-by-Step DIY Guide
Quick Comparison
| Product | Best For | Buy |
|---|---|---|
 Delta Keele 19824LF-SP (Best Overall) Delta · N/A · 6.6 lbs | Anyone who wants a reliable, good-looking pull-down faucet with strong flow and magnetic docking | |
 Kraus Oletto KPF-2620SFS (Best Value) Kraus · N/A · 4.91 lbs | Anyone who wants commercial-style performance without spending $300+ |
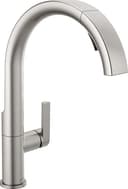
Delta Keele 19824LF-SP (Best Overall)
Anyone who wants a reliable, good-looking pull-down faucet with strong flow and magnetic docking
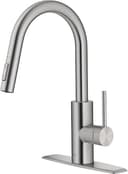
Kraus Oletto KPF-2620SFS (Best Value)
Anyone who wants commercial-style performance without spending $300+
If you're wondering how to replace a kitchen faucet, here's the good news: I think this is one of the easiest plumbing upgrades you can tackle yourself. No soldering, no pipe cutting, no permit required. Most homeowners can finish the job in about an hour, and the only real challenge is working in the cramped space under your sink.
In my opinion, a new faucet is one of the highest-impact kitchen upgrades for the money. A leaky, outdated faucet wastes water and makes your entire sink area look tired. Swapping it out for a modern pull-down or touchless model can transform how your kitchen feels, and you'll save $150 to $300 in plumber labor by doing it yourself.
Here's what you need to know before you start, the exact steps to follow, and the mistakes that catch most first-timers off guard.
Tools and Materials You'll Need
Before you crawl under the sink, gather everything first. Nothing is worse than being wedged under the cabinet and realizing you need a tool that's out in the garage.
Tools:
- Basin wrench (essential for reaching mounting nuts in tight spaces)
- Adjustable wrench
- Channel-lock pliers
- Plumber's tape (Teflon tape)
- Bucket and towels
- Flashlight or headlamp
- Flathead screwdriver
- Cordless drill (optional, for removing corroded screws on the sprayer mount)
Materials:
- New kitchen faucet (confirm it matches your sink's hole configuration)
- New supply lines (braided stainless steel recommended)
- Plumber's putty or silicone sealant (check if your faucet includes a gasket)
- Penetrating oil (WD-40 or PB Blaster, for stubborn old connections)
I'd suggest putting a basin wrench at the top of your shopping list if you don't already own one. It's the one tool that makes this job feasible. Its spring-loaded jaws pivot to grip nuts in spaces your hands and regular wrenches simply cannot reach. They cost about $15 and you'll use it every time you work on a faucet.
Step 1: Turn Off the Water Supply
Look under your sink for the two shutoff valves on the hot and cold water lines. Turn both valves clockwise until they stop. If your valves are the lever type, rotate them perpendicular to the pipe.
After shutting off the valves, open the faucet to relieve any remaining pressure and drain residual water. Let it run until the flow stops completely. This prevents water from spraying you when you disconnect the supply lines.
If your shutoff valves are old gate valves that won't fully close (or if they don't exist at all), you'll need to shut off the main water supply to your house. This is a good reason to upgrade those valves to quarter-turn ball valves while you're at it.
Step 2: Disconnect the Supply Lines
Place the bucket under the supply line connections to catch any residual water. Using your adjustable wrench, loosen the nuts connecting the supply lines to the shutoff valves by turning counterclockwise.
Next, disconnect the supply lines from the faucet tailpieces above. If the connections are corroded or stuck, spray them with penetrating oil and wait 10 to 15 minutes before trying again. Patience here saves you from rounding off nuts or snapping brittle connections.
Have towels ready. Even after draining, some water will remain in the lines and drip out when you disconnect them.
Step 3: Remove the Old Faucet
This is the step that separates a 30-minute job from a two-hour ordeal. The mounting nuts holding the faucet to the sink are located on the underside, and reaching them in the cramped space under a cabinet is the single hardest part of this project.
Grab your basin wrench. Reach up behind the sink basin and grip the mounting nut. Turn counterclockwise to loosen. I recommend spraying the mounting nuts with penetrating oil before you even start turning them, especially if the faucet has been in place for more than five years. If the nut still won't budge after 15 minutes, you may need channel-lock pliers or even a reciprocating saw with a metal-cutting blade (as a last resort).
If your old faucet has a separate sprayer hose, disconnect it from the diverter valve under the sink before lifting the faucet out. Once all mounting hardware is removed, push the faucet up from below and lift it out from the top of the sink.
Step 4: Clean the Sink Surface
With the old faucet removed, you'll likely find a ring of grime, mineral deposits, and old putty around the mounting holes. Clean this area thoroughly with a non-abrasive cleaner and a scrub pad.
This is the only time you'll have easy access to this surface, so get it clean now. Inspect the area around the holes for any cracks or damage in the sink. Leftover debris under the new faucet's base plate will prevent a proper seal and can cause leaks.
Step 5: Install the Faucet Base Plate or Gasket
Check the instructions that came with your new faucet. Most modern faucets include a rubber or foam gasket that sits between the faucet base and the sink surface. If your faucet includes a gasket, you typically don't need plumber's putty.
If no gasket is included, apply a thin bead of plumber's putty around the base of the faucet (or around the escutcheon plate if your faucet uses one). The putty creates a watertight seal that prevents water from seeping under the base plate and into the cabinet below.
For single-hole faucets being installed on a three-hole sink, attach the deck plate (escutcheon) first. The deck plate covers the unused holes and gives you a clean look.
Step 6: Set the Faucet and Secure It
Feed the faucet supply lines and any hoses (such as a pull-down sprayer hose) through the mounting hole from above. Set the faucet into position and make sure it's centered and straight.
From underneath the sink, thread the mounting nut (or nuts) onto the faucet tailpiece and hand-tighten. Then use your basin wrench to snug it down. What I find most important at this stage is restraint. The key word here is "snug," not "as tight as humanly possible." Over-tightening is one of the most common mistakes and can crack the sink, strip the threads, or warp the gasket so it no longer seals properly.
Check from above that the faucet hasn't shifted during tightening. It should sit flat against the sink with no wobble.
Step 7: Connect the Supply Lines
This is where your new braided stainless steel supply lines come in. I strongly recommend never reusing old supply lines. Old lines may have weakened connections, microscopic cracks, or corroded fittings that could fail weeks or months after installation. New supply lines cost a few dollars each and eliminate a major leak risk.
Connect one end of each supply line to the corresponding faucet tailpiece (hot to hot, cold to cold). Connect the other end to the matching shutoff valve. Hand-tighten each connection first, then give it a quarter-turn with your wrench.
Apply plumber's tape (Teflon tape) to the threaded connections on the shutoff valves before attaching the supply lines. Wrap the tape clockwise around the threads (three to five wraps). This ensures a watertight seal and makes future removal easier.
Step 8: Connect the Sprayer Hose (If Applicable)
If your new faucet has a pull-down or pull-out sprayer, the sprayer hose usually connects to the faucet body from underneath. Most modern faucets use a quick-connect fitting that simply clicks into place with no tools required.
Feed the sprayer head up through the spout and pull it out to its full extension. Check that the hose moves freely and doesn't catch on anything under the sink, including the supply lines, the garbage disposal, or the drain pipe. Attach the counterweight (included with most pull-down faucets) to the hose so the sprayer head retracts smoothly.
Step 9: Turn On the Water and Check for Leaks
This is the moment of truth. Turn the water supply valves back on slowly, opening the cold side first, then the hot side. Open the faucet to let air escape from the lines. The water may sputter for the first few seconds, which is normal.
With the faucet running, get back under the sink with your flashlight and check every connection point for leaks. Look at the supply line connections to both the shutoff valves and the faucet tailpieces. Check around the mounting nut and the base of the faucet where it meets the sink.
If you spot a drip, turn off the water and tighten the connection a small amount (a quarter-turn at most). Recheck. In my experience researching common faucet installation issues, most leaks are solved with a slight tightening or by re-applying plumber's tape.
Step 10: Test All Functions
Run both hot and cold water for a full minute. Switch the sprayer between stream and spray modes. If your faucet has a pause button or touchless activation, test those too. Check the water pressure. If it seems low, remove the aerator from the faucet tip and flush out any debris that may have collected during installation.
Open and close the cabinet doors underneath to confirm nothing is dripping after five minutes of use. Then check again an hour later. Slow leaks can take time to appear.
Single-Hole vs Three-Hole Faucet Installation Differences
Before you buy a new faucet, count the holes in your sink or countertop. This determines which faucets will work for your setup.
Single-hole sinks have one mounting hole (typically 1-3/8 inches in diameter). Single-hole faucets are the simplest to install because everything feeds through one opening. The supply connections, mounting hardware, and sprayer hose all route through the same hole.
Three-hole sinks have three holes spaced 4 inches or 8 inches apart (center to center). These were designed for two-handle faucets with a separate spout and two valve handles. You can still install a single-hole faucet on a three-hole sink by using a deck plate (also called an escutcheon plate) to cover the unused holes.
Going from three-hole to single-hole? Buy a faucet that includes a deck plate, or purchase one separately. Make sure the plate is wide enough to cover all three holes. Most standard 4-inch spread deck plates handle this without issue.
Going from single-hole to three-hole? This requires drilling additional holes in your sink or countertop, which is significantly more involved. For granite or quartz countertops, you'll want a professional with a diamond-core drill bit. For stainless steel sinks, a step drill bit works, but measure twice.
Common Mistakes to Avoid When You Replace a Kitchen Faucet
Skipping the shutoff valve test. Before you buy the faucet, test your shutoff valves. If they don't fully stop the water flow, replace them first. Discovering non-functional shutoff valves mid-project means you'll need to shut off the main water supply to the entire house.
Reusing old supply lines. I can't stress this enough: new faucet, new supply lines. Braided stainless steel supply lines cost $5 to $10 each and last for years. Old rubber or plastic lines are the number one cause of under-sink flooding.
Over-tightening connections. This is the most common beginner mistake. Tighten until snug, then add a quarter-turn at most. Over-tightening cracks porcelain sinks, strips plastic mounting nuts, and crushes rubber washers so they no longer seal.
Forgetting plumber's tape. Wrap Teflon tape clockwise around threaded connections, three to five times. Without it, metal-to-metal threaded connections will eventually seep.
Not checking faucet compatibility. Measure your sink's hole count, hole spacing, and hole diameter before buying. A faucet that doesn't fit your sink configuration will send you right back to the store.
Ignoring the garbage disposal clearance. If you have a garbage disposal, make sure the new faucet's supply lines and sprayer hose don't interfere with it. Test the sprayer hose retraction with the disposal in place.
When to Call a Plumber
Replacing a kitchen faucet is genuinely a DIY-friendly project, but there are situations where calling a professional is the smarter move.
Corroded or frozen shutoff valves. If your shutoff valves won't turn or are visibly corroded, replacing them involves soldering or working with compression fittings on the main water line. That's a different skill level entirely.
Lead or galvanized pipes. If you open the cabinet and see older galvanized steel pipes (dull gray, threaded connections), a plumber should assess whether those pipes need to be replaced. This is especially important in homes built before 1986.
Cracked or damaged sink. If removing the old faucet reveals cracks around the mounting holes, the sink may need to be replaced before installing the new faucet.
Non-standard plumbing configurations. If the supply lines under your sink don't match standard sizes, or if you find unusual fittings, a plumber can adapt the connections properly.
The labor cost for a plumber to install a kitchen faucet typically runs $150 to $300, depending on your area. If any of the above issues apply, that cost is well worth avoiding a flooded kitchen.
Recommended Faucets and Related Guides
Looking for the right replacement faucet? Check out our best kitchen faucets roundup for top picks across every budget and style. If you're also upgrading your bathroom, our best bathroom faucets guide covers the top options for vanity sinks and widespread setups.
Recommended Products
Ready to buy? These are the top picks from our best kitchen faucet guide.
Delta Keele 19824LF-SP (Best Overall)
Delta Keele 19824LF-SP (Best Overall)
Anyone who wants a reliable, good-looking pull-down faucet with strong flow and magnetic docking
Pros
- MagnaTite magnetic docking keeps the spray head locked in place
- 1.8 GPM flow and 9.75-inch reach cover large sinks well
- SpotShield finish resists fingerprints and water spots
- Deck plate and supply lines included for 1 or 3-hole installs
Cons
- 60-inch hose is shorter than the 68-inch hoses on some Moen models
- Standard ceramic disc valve, not Delta's premium DIAMOND Seal valve
- Zinc handle instead of solid brass
Kraus Oletto KPF-2620SFS (Best Value)
Kraus Oletto KPF-2620SFS (Best Value)
Anyone who wants commercial-style performance without spending $300+
Pros
- Solid brass construction and Kerox ceramic disc at a mid-range price
- QuickDock top-mount installation is the fastest on this list
- 1.75 GPM flow rate hits the sweet spot between performance and conservation
- Spot Free finish resists fingerprints effectively
Cons
- No magnetic docking system (gravity return only)
- Single-hole mount only (no deck plate included for 3-hole sinks)
- Commercial styling won't suit every kitchen aesthetic
Final Thoughts
I think learning how to replace a kitchen faucet is one of the best introductions to DIY plumbing. The tools are affordable, the process is straightforward, and the payoff is immediate. You'll save $150 or more in labor, get a faucet you actually chose (rather than whatever a builder installed), and gain the confidence to tackle more plumbing projects down the road.
The keys to a successful installation are simple: buy the right faucet for your sink configuration, use new supply lines, don't over-tighten anything, and check for leaks thoroughly before you call the job done. I'd suggest setting aside a full two hours for your first time, even though you'll likely finish faster. Take your time, and you'll have a new faucet running perfectly before you know it.
Affiliate Disclosure
This post contains affiliate links. As an Amazon Associate, HomeBuildLab earns from qualifying purchases at no additional cost to you. Learn more
Looking for the right tools and products?
Check out our product reviews and buying guides to find the best gear for your project.
Browse Reviews