How to Use a Router Table: Setup, Feed Direction, and Essential Techniques
Learn how to use a router table with my step-by-step guide. Covers setup, feed direction, edge profiling, joinery, and the safety rules that prevent kickback.
Reader-supported: we may earn a commission when you buy through links on this page, at no extra cost to you. How we research
We don't run a test lab. For each guide we compare manufacturer specs, warranty terms and owner reviews, then match models to specific jobs and budgets. We say when a pick is a trade-off, and every product has cons listed.
As an Amazon Associate, HomeBuildLab earns from qualifying purchases. Read our full affiliate disclosure.

A router table turns a handheld router into a precision woodworking station. If you have been wrestling with a router freehand, flipping it upside down into a table changes everything: more control, more consistency, and the ability to tackle operations that are nearly impossible any other way. I think knowing how to use a router table properly is the single biggest leap a woodworker can make. It is the difference between clean, repeatable cuts and chewed-up workpieces (or worse, a trip to the emergency room).
Here is the truth that surprises most beginners: the router table itself is not complicated. It is a flat surface, a fence, and a spinning bit. But the technique matters enormously. I learned this the hard way when a workpiece kicked back across my shop because I fed it the wrong direction. Feed direction alone accounts for more ruined workpieces and safety incidents than any other single factor. Get that right, along with a few fundamental setup habits, and you will wonder how you ever worked without one.
This guide covers the anatomy of a router table, how to set one up correctly, the critical feed direction rule, the most common operations, and the safety practices that keep your fingers intact. If you are shopping for a table, check out my best router tables roundup first.
Router Table Anatomy: Know Your Machine
Before you power anything up, take a few minutes to understand the key parts of your router table. Every component plays a role in cut quality and safety.
The Table Surface
The tabletop needs to be flat. That sounds obvious, but even a slight bow will produce inconsistent cuts. Quality router tables use MDF with laminate, cast aluminum, or phenolic resin surfaces. In my opinion, cast aluminum is the best balance of flatness and durability, but laminated MDF works well for most hobbyists. The flatter the table, the more precise your work.
The Insert Plate
This is the removable plate in the center of the table that holds your router. The router mounts to the underside of the insert plate, and the bit pokes through a hole in the center. Most insert plates come with reducer rings (concentric rings that snap into the opening) so you can match the hole size to your bit diameter. A snug fit around the bit reduces tear-out and improves dust collection.
The Fence
The fence is your primary guide for straight-line cuts. It runs across the table surface and controls how much of the bit contacts the workpiece. A good fence is straight, rigid, and easy to adjust both parallel to and toward/away from the bit. Many fences have independently adjustable faces on each side of the bit opening, which is useful for jointing operations.
The Miter Slot
A T-track or miter slot runs the length of the table, parallel to the bit. It accepts a miter gauge for cross-grain cuts and provides a mounting point for featherboards and other jigs. Not every router table includes one, but it dramatically expands what you can do.
The Dust Port
Router tables generate an astonishing volume of chips and fine dust. The dust port (usually a 2-1/2 inch fitting on the fence and sometimes on the cabinet below) connects to your shop vacuum or dust collector. Use it every time. Dust buildup around the bit affects cut quality and visibility.
Setting Up Your Router Table
Proper setup takes five to ten minutes and saves hours of frustration. Do not skip these steps.
Mounting the Router
If your router is not already attached, secure it to the underside of the insert plate using the mounting holes. Make sure the base sits flush against the plate with no gaps. Tighten the screws evenly. A router that shifts mid-cut is dangerous and will ruin your workpiece.
Drop the insert plate into the table opening and check that it sits perfectly flush with the table surface. Most plates have leveling screws at the corners. Use a straightedge across the plate and table to verify. If the plate sits even slightly proud or below the surface, your workpiece will catch on the edge.
Setting Bit Height
Unplug the router (or remove the battery) before changing bits. Insert the bit into the collet, leaving at least 3/4 of the shank engaged. Tighten the collet firmly with the wrenches provided.
Set the bit height using a combination square, a setup block, or the graduated scale on your router's depth adjustment. For most operations, you want to remove no more than 1/4 inch of material per pass. I recommend erring on the side of even shallower passes when you are starting out. Taking lighter cuts produces cleaner results and puts less strain on the bit, the router, and you.
Adjusting the Fence
Position the fence so the bit protrudes the correct amount. For edge profiles using a bearing-guided bit, you may not need the fence at all (the bearing controls the depth of cut). For straight bits, the fence is essential.
Check that the fence is parallel to the miter slot by measuring the distance from the slot to the fence face at both ends. Lock it down firmly. A fence that drifts during a cut produces a tapered edge that is difficult to fix.
Open the dust port on the fence and connect your shop vacuum before you start cutting. Close the fence faces as tight to the bit as possible while still leaving clearance for the workpiece. This improves dust collection and reduces the bit opening, which supports the wood fibers and minimizes tear-out.
Feed Direction: The Most Important Rule
This single concept prevents more accidents and ruined workpieces than everything else combined. Get it wrong, and the router will grab your workpiece and throw it across the shop.
On a router table, always feed the workpiece from right to left when standing at the front of the table. This means you are feeding the wood against the rotation of the bit. I believe this is the single most important thing to memorize before you ever turn on a router table.
Here is why. The router bit spins clockwise when viewed from above the table. Feeding from right to left pushes the workpiece into the fence, giving you control. The bit's rotation works with you, pressing the wood against your guide surface.
If you feed from left to right (called a "climb cut"), the bit's rotation pulls the workpiece away from the fence and out of your hands. At best, you get a scalloped, uneven edge. At worst, the bit grabs the wood and launches it. Climb cuts are occasionally used by experienced woodworkers for specific situations (like reducing tear-out on figured grain), but they should be extremely shallow and are never recommended for beginners.
The simple rule: stand at the front of the table, feed from your right to your left. Every time.
For cuts using the miter gauge (cross-grain work without the fence), the same principle applies. Feed the workpiece so the bit rotation pushes it into the miter gauge fence, not away from it.
Common Router Table Operations
A router table handles an impressive range of tasks. Here are the operations you will use most often.
Edge Profiling
This is the most popular router table operation: adding a decorative shape to the edge of a board. Roundovers, chamfers, ogees, cove profiles, and Roman ogees all fall into this category.
Use a bearing-guided profiling bit. The bearing rides along the edge of the workpiece and controls the cut depth automatically. You can use the fence as an additional guide, but it is not strictly necessary. Make the full profile in two or three passes of increasing depth rather than one heavy cut. Personally, I prefer three light passes over two medium ones. The finish will be noticeably smoother, and the difference in time is minimal.
Rabbets
A rabbet is an L-shaped notch cut along the edge of a board, commonly used for joining the backs of cabinets and bookshelves. You can cut rabbets with a straight bit and the fence (the fence controls the width, and the bit height controls the depth) or with a dedicated rabbeting bit that has a bearing. The fence method gives you more flexibility because you can set any width you want.
Dadoes and Grooves
A dado runs across the grain; a groove runs with the grain. Both are flat-bottomed channels cut into the face of a board. Use a straight bit and guide the workpiece along the fence (for grooves) or with a miter gauge (for dadoes). For dadoes wider than your bit, make multiple overlapping passes or use a wider straight bit.
These joints are the backbone of shelving, cabinet carcasses, and drawer construction. I'd take a router table over a table saw with a dado stack for this job any day, especially in plywood where the router produces a much cleaner cut.
Raised Panels
Panel-raising bits are large and should only be used in a router table, never freehand. They shape the edges of a flat panel to create the beveled profile you see on traditional cabinet doors. Because these bits are heavy and remove a lot of material, use a variable-speed router set to a lower RPM (around 12,000 to 14,000 RPM for large panel raisers). Take multiple light passes.
Joinery
With the right jig or fence setup, a router table handles box joints, lock miters, tongue-and-groove joints, and even dovetails. A simple straight bit paired with a miter gauge and a stop block is all you need for box joints. What I like most about router table joinery is the repeatability. These operations require precise setup, but once dialed in, they produce joints that are tighter and more consistent than hand-cut alternatives.
Safety Rules for the Router Table
A router table is safer than freehand routing in most situations, but it still demands respect. The bit spins at 10,000 to 25,000 RPM and is exposed.
Use Featherboards
Featherboards clamp into the miter slot or fence and apply spring pressure against the workpiece, holding it firmly against the fence and down against the table. Position them at least one inch ahead of the bit (never beside or behind it). A featherboard behind the bit creates a pinch point and increases the risk of kickback.
Use Push Sticks and Push Pads
When the workpiece passes within a few inches of the bit, your fingers should not be anywhere near it. Push sticks guide narrow stock past the bit. Push pads give you downward pressure on wider pieces. Keep several within arm's reach of your router table at all times.
Protect Your Eyes and Ears
Safety glasses are mandatory. A router table throws chips at high speed, and a shattered bit (rare but possible) sends fragments in every direction. Hearing protection is also necessary. Routers running under load are consistently above 90 decibels.
Never Route Pieces That Are Too Small
If a workpiece is too short or too narrow to safely control with push sticks and featherboards, do not route it on the table. The general rule: if the piece is shorter than 12 inches or narrower than 3 inches, attach it to a larger backer board with double-sided tape or clamps before routing.
Always Use Dust Collection
This is not just about cleanliness. Sawdust buildup around the bit hinders visibility and can clog the cut, causing the bit to overheat or the workpiece to bind. Connect a shop vacuum or dust collector to both the fence port and the cabinet port (if your table has one). After sanding your finished pieces with a quality orbital sander, you will appreciate keeping dust under control from the start.
Common Mistakes to Avoid
Even experienced woodworkers fall into these traps. Recognizing them before they happen is half the battle.
Feeding in the wrong direction. This is the number one mistake. If the workpiece jumps or gets pulled out of your hands, you fed it the wrong way. Always right to left from the front of the table.
Taking too deep a cut. Removing more than 1/4 inch in a single pass overloads the bit, scorches the wood, and dramatically increases the chance of kickback. Multiple shallow passes are always better. Yes, it takes longer. The results are worth it.
Skipping dust collection. Sawdust packed around the bit causes burning, poor cut quality, and reduced visibility. It takes thirty seconds to connect a hose.
Leaving the fence unsecured. A fence that slides during a cut produces a tapered or wavy edge. Always double-check that your fence clamps are tight before powering on the router. Give the fence a firm push to test it.
Ignoring bit condition. Dull bits burn wood, require more force, and increase kickback risk. If you see burn marks on your workpiece or the router is struggling under load, it is time for a new bit. Carbide-tipped bits stay sharper longer, but they still wear out. I recommend replacing or resharpening bits after roughly 20 to 30 hours of use, depending on the material. I'd pick a resharpening service over buying cheap replacement bits every time.
Routing end grain without support. When routing across the end of a board (like profiling the end of a shelf), the bit tends to blow out the trailing edge. Use a backer board clamped to the trailing edge, or route the end grain first, then the long grain edges. The long grain pass will clean up any minor blow-out.
Compare our picks
2 picks- Best OverallBosch RA1181 Benchtop Router Table
Bosch · N/A (router not included) · 30 lbs
Woodworkers who want a reliable, no-fuss benchtop table that fits almost any router
$200.69Amazon price as of Oct 7, 5:49 PM EDTProduct prices and availability are accurate as of the date/time indicated and are subject to change. Any price and availability information displayed on Amazon.com at the time of purchase will apply to the purchase of this product.
View on Amazon - Best ValueRockler Trim Router Table
Rockler · N/A (router not included) · 6.75 lbs
Beginners with a trim router who want to practice table techniques on small parts for a small investment
$92.99Amazon price as of Oct 7, 5:49 PM EDTProduct prices and availability are accurate as of the date/time indicated and are subject to change. Any price and availability information displayed on Amazon.com at the time of purchase will apply to the purchase of this product.
View on Amazon
Recommended Tools
Ready to buy? These are the top picks from our best router table guide.

Bosch RA1181 Benchtop Router Table
Best for: Woodworkers who want a reliable, no-fuss benchtop table that fits almost any router
- Brand
- Bosch
- Type
- Benchtop router table
- Power
- N/A (router not included)
- Material
- Aluminum top, MDF fence plates
- Weight
- 30 lbs
- Size
- 27" x 18" work surface
- Warranty
- 1-year Bosch warranty
$200.69Amazon price as of Oct 7, 5:49 PM EDTProduct prices and availability are accurate as of the date/time indicated and are subject to change. Any price and availability information displayed on Amazon.com at the time of purchase will apply to the purchase of this product.
What we like
- Aluminum top stays flat and won't warp from humidity
- Compatible with most major router brands out of the box
- Tall fence with adjustable faceplates and outfeed shims
- Includes starter pin and guard for curved routing
Watch out for
- No stand included, so you'll need a workbench or separate stand
- Dust collection port is on the fence only (no below-table port)
- Mounting plate requires below-table access for bit changes
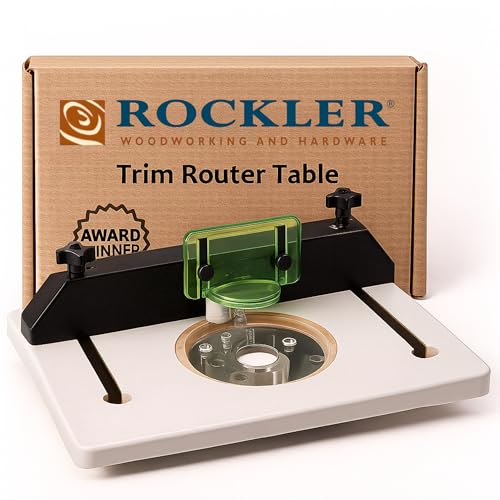
Rockler Trim Router Table
Best for: Beginners with a trim router who want to practice table techniques on small parts for a small investment
- Brand
- Rockler
- Type
- Compact benchtop router table (trim routers)
- Power
- N/A (router not included)
- Material
- Vinyl-wrapped MDF top, 1/4" acrylic router base
- Weight
- 6.75 lbs
- Size
- 11-1/2" x 15-1/2" work surface
$92.99Amazon price as of Oct 7, 5:49 PM EDTProduct prices and availability are accurate as of the date/time indicated and are subject to change. Any price and availability information displayed on Amazon.com at the time of purchase will apply to the purchase of this product.
What we like
- Under $100 for a well-made, compact table from a trusted woodworking brand
- Pre-drilled acrylic base fits most popular trim routers
- High-visibility bit guard and adjustable fence included
- Light enough to store on a shelf and clamp anywhere
Watch out for
- 11-1/2" x 15-1/2" surface only suits small workpieces
- Trim routers only; won't accept a full-size router
- Not suited to large bits or the joinery techniques covered above
Final Thoughts
I believe learning how to use a router table is one of the best investments you can make in your woodworking skills. The tool itself is straightforward: a flat table, a fence, and a spinning bit. What separates clean, professional results from frustration is technique. Feed from right to left. Take shallow passes. Use featherboards and push sticks. Keep your bits sharp and your dust collection running.
Start with simple edge profiles to build confidence, then work up to rabbets, dadoes, and joinery as your comfort level grows. Personally, my router table gets more use than almost any other tool in the shop, and I think most woodworkers would say the same once they get comfortable with it.
If you are still shopping for a setup, my best router tables guide breaks down the top options for every budget. For learning to sand your finished pieces, a quality orbital sander is the next step toward a flawless finish.
Affiliate Disclosure
This post contains affiliate links. As an Amazon Associate, HomeBuildLab earns from qualifying purchases at no additional cost to you. Learn more
Prices shown are from Amazon at the time indicated and may change. The price and availability on Amazon.com at the time of purchase apply.
Sam Hartwell
Sam Hartwell edits HomeBuildLab's tool reviews and home improvement guides. Every pick starts with manufacturer spec sheets, warranty terms, parts availability and owner feedback, then gets matched to a specific job and budget. Guides list the trade-offs plainly and get updated when models change or go out of stock.
Keep reading: Sanding & Finishing
All sanding & finishing guides → Top Picks
Sanding & Finishing
Best Router Tables in 2026: Benchtop and Floor Models Compared
I compared the best router tables from budget to full-size floor models. Find the right router table for your shop with honest picks and a buying guide.
Updated
 Comparison
Sanding & Finishing
HVLP vs Airless Paint Sprayer: Choosing the Right Spray Method
HVLP vs airless paint sprayer: I compare finish quality, speed, overspray, cost, and cleanup so you can pick the right sprayer for your next DIY project.
Updated
 How-To
Sanding & Finishing
How to Use a Paint Sprayer Indoors: Get Pro-Quality Walls Without the Mess
Learn how to use a paint sprayer indoors with pro tips on room prep, ventilation, spray technique, and cleanup. Get smooth, even walls faster than rolling.
Updated
 How-To
Sanding & Finishing
How to Sand Wood: A Step-by-Step Guide for Beginners
Learn how to sand wood the right way with this beginner guide. Grit progression, hand vs power sanding, mistakes to avoid, and pro tips for a flawless finish.
Updated
 How-To
Sanding & Finishing
What Can You Do with a Heat Gun? 15 Uses You Probably Haven't Thought Of
Wondering what can you do with a heat gun? From stripping paint to roasting coffee beans, discover 15 practical uses with temperature tips for each job.
Updated
 Comparison
Sanding & Finishing
Belt Sander vs Orbital Sander: Two Sanders, Very Different Results
Belt sander vs orbital sander: I compare sanding motion, stock removal, finish quality, and price to help you pick the right sander for your next project.
Updated
The HomeBuildLab newsletter
New guides and tool deals worth knowing about
One short email when we publish or update a buying guide. No spam, unsubscribe anytime.