How to Use a Paint Sprayer Indoors: Get Pro-Quality Walls Without the Mess
Learn how to use a paint sprayer indoors with pro tips on room prep, ventilation, spray technique, and cleanup. Get smooth, even walls faster than rolling.
Reader-supported: we may earn a commission when you buy through links on this page, at no extra cost to you. How we research
We don't run a test lab. For each guide we compare manufacturer specs, warranty terms and owner reviews, then match models to specific jobs and budgets. We say when a pick is a trade-off, and every product has cons listed.
As an Amazon Associate, HomeBuildLab earns from qualifying purchases. Read our full affiliate disclosure.

If you want to know how to use a paint sprayer indoors, here is the most important thing I can tell you: it can cut your painting time in half and give you a smoother, more professional finish than any roller. But the truth most people learn the hard way is that the actual spraying takes about 20% of your time. The other 80% is preparation.
I learned this the hard way on my first indoor spray job: if you skip the prep, you will spend more time cleaning overspray off your floors, furniture, and trim than you would have spent just rolling the walls. If you do it right, though, I believe you will wonder why you ever picked up a roller for a full room.
This guide walks you through every step of how to use a paint sprayer indoors, from masking your room to cleaning your equipment. Whether you are repainting a bedroom, refinishing kitchen cabinets, or priming new drywall, these techniques will help you get a clean, even coat with minimal overspray.
Prep Your Room Before You Spray
In my opinion, room preparation is the most important part of indoor spray painting. Overspray is a fine mist that travels further than you expect, and it settles on every exposed surface. Cutting corners here means hours of cleanup later.
Clear the Space
Remove all furniture from the room. If a piece is too heavy to move, slide it to the center of the room and cover it completely with plastic sheeting. Do not rely on a single layer of thin plastic. Use 1-mil or thicker painter's plastic, and tape every seam shut.
Remove all outlet covers, switch plates, light fixtures, curtain rods, and wall hangings. Put the screws back into the electrical boxes so you do not lose them. If you have door hardware you want to protect, either remove it or wrap it tightly with painter's tape and plastic.
Mask Everything You Are Not Painting
Use painter's tape along all edges where two surfaces meet: baseboards, crown molding, window frames, and door casings. For best results, press the tape edge down firmly with a putty knife to create a seal. This prevents paint from bleeding underneath.
For large areas like windows and doorframes, I recommend pre-taped masking film (also called painter's plastic with tape attached). This saves significant time compared to taping and sheeting separately. Unroll it, press the tape edge along the frame, then unfold the plastic to cover the glass or surface.
Cover the Floors
Lay canvas drop cloths or rosin paper over the entire floor. Canvas is preferable to plastic sheeting on floors because it stays in place, absorbs drips, and does not create a slipping hazard. If you use plastic on the floor, tape the edges down securely.
Overlap your floor covering by at least 6 inches at every seam and tape the seams shut. Overspray will find any gap you leave.
Seal HVAC Vents and Returns
This step is critical and often forgotten. Cover every supply vent and return air register with plastic and tape. If your HVAC system is running while you spray, it will pull paint mist into your ductwork and distribute it throughout your house. Turn off the HVAC system entirely while spraying and for at least 30 minutes after you finish.
Ventilation Is Non-Negotiable When You Use a Paint Sprayer Indoors
Proper ventilation protects your health and helps paint dry correctly. Even low-VOC latex paints release fumes that can cause headaches, dizziness, and respiratory irritation in an enclosed space.
Cross-Ventilation Setup
Open at least two windows on opposite sides of the room. Place a box fan in one window facing outward to exhaust air, and leave the opposite window open to draw fresh air in. This creates a cross-ventilation flow that pulls fumes and overspray mist out of your workspace.
If the room has only one window, open it and position the fan facing outward. Crack the door to an adjacent room with a window open. Any airflow is better than none.
Wear a Respirator
A standard dust mask is not enough for indoor spraying. You need a half-face respirator with organic vapor cartridges (P100/OV rated). This protects against both the fine particulate from atomized paint and the volatile organic compounds in the fumes.
Wear safety glasses or goggles as well. Paint mist irritates your eyes, and you will not notice it until hours later. A disposable Tyvek suit or old clothes you can throw away will save your skin and wardrobe from overspray.
Timing Matters
Try to spray during mild weather when you can keep windows open comfortably. Extremely cold or humid conditions affect both ventilation and paint drying time. Ideal conditions are 50 to 85 degrees Fahrenheit with moderate humidity.
Choose the Right Sprayer for Indoor Work
Not all paint sprayers are created equal, and the type you choose has a direct impact on overspray, finish quality, and how much masking you need to do.
HVLP Sprayers: Best for Precision and Small Rooms
HVLP (High Volume, Low Pressure) sprayers atomize paint at around 10 PSI, which produces significantly less overspray than airless models. They transfer up to 90% of the paint onto the surface, meaning less waste and less mess. HVLP sprayers are the best choice for cabinets, trim, doors, furniture, and smaller rooms where overspray control is critical.
The trade-off is speed. HVLP sprayers apply paint more slowly than airless models, so they are not ideal for large open floor plans or whole-house repaints. For a deeper comparison, see our guide on HVLP vs airless paint sprayers.
Airless Sprayers: Best for Large Walls and Full Rooms
Airless sprayers pump paint at 1,500 to 3,000 PSI, which covers large surfaces quickly. A single pass with an airless sprayer lays down more paint than multiple passes with HVLP. If you are spraying multiple rooms, ceilings, or new construction drywall, airless is the more practical choice.
The downside is overspray. Airless sprayers have a transfer efficiency of roughly 50%, which means half the paint ends up somewhere other than your wall. This demands thorough masking and good ventilation. Using fine-finish tips (more on those below) helps reduce overspray significantly.
My Recommendation
I recommend starting with an HVLP sprayer for most indoor projects unless you are painting more than two full rooms. If you are doing a whole-house repaint or extensive new construction, an airless with fine-finish tips makes more sense. Need help choosing? Check out our best paint sprayer roundup for top picks in both categories.
Thin Your Paint (If Needed)
Many latex paints spray well straight from the can through an airless sprayer. HVLP sprayers, however, often require some thinning because they operate at lower pressure and need paint to atomize through a smaller nozzle.
When to Thin
If paint sputters, spits, or comes out with an uneven, "orange peel" texture during your test spray, the paint is too thick. Thicker paints like cabinet enamels, primers, and some high-hide wall paints almost always need thinning for HVLP use.
How to Check Viscosity
Most sprayers come with a viscosity cup (a small funnel-shaped cup with a hole in the bottom). Fill it with paint and time how long it takes to drain. Your sprayer's manual will list the target drain time, usually between 20 and 30 seconds for latex paints. If the paint drains too slowly, it needs thinning.
How to Thin
Add water in small increments: start with about 10% (roughly 12 ounces per gallon). Stir thoroughly, then test with the viscosity cup again. Repeat until you reach the target drain time. Do not thin more than 20% total, or you risk poor coverage and adhesion.
Always use the manufacturer's recommended thinner. For latex paints, that is clean water. For oil-based paints and lacquers, use the solvent specified on the can (mineral spirits, lacquer thinner, etc.).
Pro tip: Mix more than you think you need. Running out mid-wall and mixing a second batch to exactly the same consistency is harder than it sounds, and inconsistency shows in the final coat.
Choose the Right Spray Tip
The spray tip (also called a nozzle) controls two things: the width of the spray fan and the amount of paint that flows through. Getting the right tip makes a dramatic difference in finish quality and overspray.
How Tip Numbers Work
Airless spray tips use a three-digit number. The first digit, multiplied by two, gives you the fan width in inches. The last two digits are the orifice size in thousandths of an inch. For example, a 515 tip produces a 10-inch fan with a 0.015-inch orifice.
Indoor Tip Recommendations
| Surface | Airless Tip | Why |
|---|---|---|
| Walls and ceilings (latex paint) | 515 or 517 | The wider fan covers more area per pass, and the medium orifice handles standard wall paint well. |
| Trim, doors, and cabinets | 310 or 410 | The narrower fan gives you more control, and the smaller orifice produces a finer finish with less overspray. |
| Primer | 517 or 519 | Primers are typically thinner and benefit from a wider fan for faster coverage. |
Fine-finish tips: If your sprayer supports them, fine-finish tips (often labeled "FF" or "LP" for low pressure) reduce operating pressure at the tip by up to 50%, cutting overspray significantly. What I like most about fine-finish tips is how much cleaner they keep your masking, and I'd pick them over standard tips for any indoor project.
For HVLP sprayers, tip selection is simpler. Most come with interchangeable needle and nozzle sets sized in millimeters. Use a 1.3 to 1.5 mm set for trim paints and enamels, and a 1.8 to 2.0 mm set for latex wall paints.
Spray Technique: Step by Step
With the room prepped, ventilation running, paint thinned, and the right tip installed, you are ready to spray. Before pointing the gun at your wall, practice on a piece of cardboard or scrap drywall to dial in your settings.
Step 1: Prime the Sprayer
Fill the hopper or connect the suction tube to your paint bucket. Run the sprayer until paint flows evenly from the gun with no air bubbles or sputtering. Point the gun into a waste bucket during priming, not at the wall.
Step 2: Test Your Pattern
Spray a test pattern on cardboard. You want an even, consistent coat without heavy spots in the center or light edges (called "tailing"). Adjust the pressure up or down until the pattern looks uniform. If paint is running or dripping, reduce the pressure or increase your distance from the surface.
Step 3: Maintain Proper Distance
Keep the gun 10 to 12 inches from the wall. Too close and the paint runs. Too far and you get a dry, rough texture with excessive overspray. Keep your wrist locked and move your entire arm to maintain a consistent distance across the pass.
Step 4: Use Straight, Overlapping Passes
Move the gun in straight horizontal passes. Start your arm motion before pulling the trigger, and release the trigger before stopping your arm. This prevents heavy buildup at the start and end of each pass. Overlap each pass by about 50%, so the bottom edge of one pass aligns with the center of the next.
Step 5: Keep a Consistent Speed
Move at a steady pace, roughly 3 to 4 feet per second. Moving too fast leaves thin, uneven coverage. Moving too slowly causes runs and drips. If you catch yourself slowing down, that section will end up heavier than the rest.
Step 6: Work in Sections
Divide the wall into manageable sections, roughly 3 to 4 feet wide. Complete each section from top to bottom before moving to the next. Maintain a wet edge by slightly overlapping into the previous section while the paint is still wet. This prevents visible seams between sections.
Step 7: Back-Roll Walls
This is the step most beginners skip. I think back-rolling is the single biggest difference between an amateur-looking spray job and a professional one. Immediately after spraying a section (within one to two minutes), go over it lightly with a 3/8-inch nap roller. This is called back-rolling.
Back-rolling serves three purposes. First, it pushes paint into the texture of the drywall for better adhesion. Second, it smooths out any inconsistencies in the spray pattern. Third, it eliminates raised fibers on new drywall that spraying alone can leave behind.
You do not need to back-roll cabinets, trim, or doors. Those surfaces benefit from the smooth, spray-only finish. Back-rolling is primarily for walls and ceilings.
Common Indoor Spraying Mistakes
Even with good technique, a few common mistakes can ruin an indoor paint job. Watch out for these.
Spraying Too Close
Holding the gun 4 to 6 inches from the wall causes runs, drips, and heavy buildup. It also wastes paint. Maintain 10 to 12 inches consistently.
Arcing the Gun
Swinging your arm in an arc instead of a straight line means the edges of each pass are farther from the wall than the center. This creates uneven coverage with heavy centers and light edges. Keep your wrist locked and move from the shoulder.
Skipping the Test Spray
Every new batch of paint, every tip change, and every session should start with a test spray on cardboard. Pressure, viscosity, and tip condition can all change, and it takes 10 seconds to verify your pattern.
Poor Ventilation
Spraying in a closed room creates a fog of paint mist that settles on everything, including your freshly painted wet wall. It also poses serious health risks. Keep air moving from the moment you start until well after you finish.
Not Back-Rolling Walls
Sprayed paint sits on top of drywall without penetrating the surface. Over time, this leads to peeling and flaking, especially in high-moisture areas like bathrooms and kitchens. Back-rolling is five extra minutes per wall and years of extra durability.
Using the Wrong Tip
A tip that is too large for indoor work creates excessive overspray and a rough texture. A tip that is too small clogs frequently and slows you down. Match the tip to your paint and your surface, not to what was already in the gun from your last project.
Cleanup and Storage
Cleaning your sprayer immediately after use is essential. Paint that dries inside the pump, hose, or gun will ruin seals and clog passages. Most sprayer repairs stem from poor cleanup habits.
For Latex (Water-Based) Paint
- Remove the tip and guard. Soak them in warm water.
- Run clean water through the sprayer until it flows clear. This usually takes two to three cycles of filling the hopper or bucket with water and spraying it through.
- Remove the gun filter and manifold filter. Clean both under running water with a soft brush.
- Wipe down the exterior of the gun, hose, and pump housing.
- Apply a light coat of pump armor or mineral oil to the pump for storage.
For Oil-Based Paint
Follow the same steps, but substitute mineral spirits for water. Run mineral spirits through the system until clear, then follow with a clean water flush. Dispose of used solvent according to your local regulations.
Tip Care
Inspect your spray tip after each use. If the pattern has become uneven or the orifice looks worn, replace it. Tips are consumables and lose precision over time, especially when spraying latex paint which is mildly abrasive. A worn tip increases overspray and decreases finish quality.
Storing Between Coats
If you are applying a second coat the same day, you do not need a full cleanup. For latex paint, wrap the gun and tip in a damp rag and seal it in a plastic bag. It will stay workable for several hours. For oil-based paints, submerge the tip in solvent. Never leave paint sitting in the pump overnight without flushing.
Recommended Equipment
A quality sprayer makes indoor painting faster and less frustrating. Personally, I prefer having a dedicated indoor sprayer rather than sharing one between indoor and outdoor jobs. If you are in the market, check out our best paint sprayers roundup for top picks across HVLP and airless categories. And if you are prepping surfaces before painting (you should be), a good orbital sander is worth having for smoothing out patched areas, scuffing old paint, and feathering repair spots.
If you're using an HVLP gun that connects to a compressor rather than a turbine system, our best air compressors guide can help you pick the right unit. For a detailed breakdown of which sprayer type fits your project, our HVLP vs airless paint sprayer comparison covers the key differences in cost, overspray, speed, and finish quality.
Compare our picks
2 picks- Best OverallGraco Magnum X5
Graco · Corded · 17 lbs
Interior and exterior painting projects up to 10 gallons
$322.00Amazon price as of Oct 7, 5:33 PM EDTProduct prices and availability are accurate as of the date/time indicated and are subject to change. Any price and availability information displayed on Amazon.com at the time of purchase will apply to the purchase of this product.
View on Amazon - Best Budget AirlessWagner Control Pro 130
Wagner · Corded · 10 lbs
Beginners and small to medium airless projects
$232.37Amazon price as of Oct 7, 5:33 PM EDTProduct prices and availability are accurate as of the date/time indicated and are subject to change. Any price and availability information displayed on Amazon.com at the time of purchase will apply to the purchase of this product.
View on Amazon
Recommended Tools
Ready to buy? These are the top picks from our best paint sprayer guide.

Graco Magnum X5
Best for: Interior and exterior painting projects up to 10 gallons
- Brand
- Graco
- Type
- Airless
- Power
- Corded
- Voltage
- 120V
- Weight
- 17 lbs
$322.00Amazon price as of Oct 7, 5:33 PM EDTProduct prices and availability are accurate as of the date/time indicated and are subject to change. Any price and availability information displayed on Amazon.com at the time of purchase will apply to the purchase of this product.
What we like
- Stainless steel piston pump handles thick coatings without bogging down
- Adjustable pressure control for precise output on different materials
- Sprays directly from 1 or 5 gallon buckets
- PowerFlush adapter connects to a garden hose for easier cleanup
Watch out for
- 25-foot hose may be short for large exterior projects (extensions sold separately)
- Heavier than handheld options at 17 lbs
- Overspray requires careful masking, like all airless sprayers
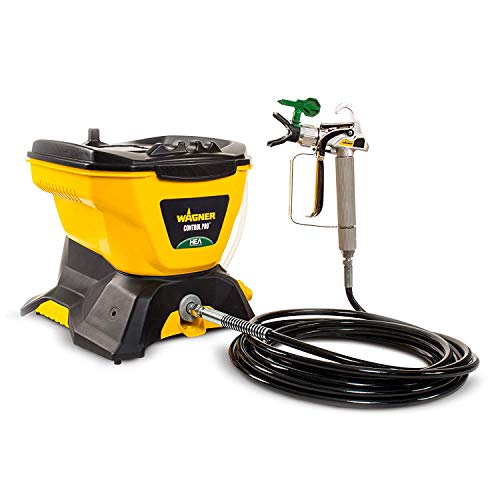
Wagner Control Pro 130
Best for: Beginners and small to medium airless projects
- Brand
- Wagner
- Type
- Airless (HEA Technology)
- Power
- Corded
- Voltage
- 120V
- Weight
- 10 lbs
$232.37Amazon price as of Oct 7, 5:33 PM EDTProduct prices and availability are accurate as of the date/time indicated and are subject to change. Any price and availability information displayed on Amazon.com at the time of purchase will apply to the purchase of this product.
What we like
- HEA technology reduces overspray by up to 55%
- Lightweight and portable at only 10 lbs
- Built-in hopper eliminates bucket and suction tube setup
- Sprays 3X faster than a roller
Watch out for
- Lower PSI limits use with thicker coatings
- 1.5 gallon hopper means more refills on large jobs
- Not powerful enough for whole-house exterior projects
Final Thoughts
Learning how to use a paint sprayer indoors takes some practice, but I think the payoff is absolutely worth it. You will finish rooms in a fraction of the time it takes to roll, and the finish will be smoother and more consistent. The secret is not in the spraying itself. It is in the preparation: thorough masking, proper ventilation, the right tip, and well-thinned paint.
Start with a small project like a closet or a single accent wall to build confidence before tackling an entire room. Practice your technique on cardboard until your pattern is consistent. And always back-roll your walls.
Once you have the process down, you will never want to go back to rolling full rooms again. I still use a roller for small touch-ups, but for anything bigger than a closet, the sprayer wins every time. A paint sprayer is one of those tools that feels like overkill until you use it, and then it feels indispensable.
Affiliate Disclosure
This post contains affiliate links. As an Amazon Associate, HomeBuildLab earns from qualifying purchases at no additional cost to you. Learn more
Prices shown are from Amazon at the time indicated and may change. The price and availability on Amazon.com at the time of purchase apply.
Sam Hartwell
Sam Hartwell edits HomeBuildLab's tool reviews and home improvement guides. Every pick starts with manufacturer spec sheets, warranty terms, parts availability and owner feedback, then gets matched to a specific job and budget. Guides list the trade-offs plainly and get updated when models change or go out of stock.
Keep reading: Sanding & Finishing
All sanding & finishing guides → Comparison
Sanding & Finishing
HVLP vs Airless Paint Sprayer: Choosing the Right Spray Method
HVLP vs airless paint sprayer: I compare finish quality, speed, overspray, cost, and cleanup so you can pick the right sprayer for your next DIY project.
Updated
 Top Picks
Sanding & Finishing
Best Paint Sprayers for DIY: 7 Models Compared for 2026
Find the best paint sprayer for your project. I compared HVLP, airless, and handheld models from Graco, Wagner, and Fuji to help you spray like a pro.
Updated
 How-To
Sanding & Finishing
How to Use a Router Table: Setup, Feed Direction, and Essential Techniques
Learn how to use a router table with my step-by-step guide. Covers setup, feed direction, edge profiling, joinery, and the safety rules that prevent kickback.
Updated
 How-To
Sanding & Finishing
How to Sand Wood: A Step-by-Step Guide for Beginners
Learn how to sand wood the right way with this beginner guide. Grit progression, hand vs power sanding, mistakes to avoid, and pro tips for a flawless finish.
Updated
 How-To
Sanding & Finishing
What Can You Do with a Heat Gun? 15 Uses You Probably Haven't Thought Of
Wondering what can you do with a heat gun? From stripping paint to roasting coffee beans, discover 15 practical uses with temperature tips for each job.
Updated
 Comparison
Sanding & Finishing
Belt Sander vs Orbital Sander: Two Sanders, Very Different Results
Belt sander vs orbital sander: I compare sanding motion, stock removal, finish quality, and price to help you pick the right sander for your next project.
Updated
The HomeBuildLab newsletter
New guides and tool deals worth knowing about
One short email when we publish or update a buying guide. No spam, unsubscribe anytime.